

=VG= SemlerPDX
-
Posts
4,877 -
Joined
-
Last visited
Content Type
Profiles
Forums
Events
Downloads
Gallery
Articles
AVCS Bug Reports (automated)
AVCS Bug Reports (manual)
VG Wiki
Blogs
Store
Blog Comments posted by =VG= SemlerPDX
-
-
Thanks for the heads up on the button array - I literally forgot to increment the size of the array. Didn't test (and it's late). I've edited my reply so we don't trip up the next guy who goes through all this. Cheers!
If the new rotary isn't working then those pins are not Interrupt pins on that board (looks like the generic Pro Micro like I used), I literally took a shot in the dark based on what I now assume was an incorrect pinout on google images.
I've looked it up proper now, and for the record, I was mistaken - there are only 5 interrupt pins on the pro-micro. 3 rotary encoders in the method I have used in my DIY would require 6 total.
QuoteThe Pro Micro has five external interrupts, which allow you to instantly trigger a function when a pin goes either high or low (or both). If you attach an interrupt to an interrupt-enabled pin, you'll need to know the specific interrupt that pin triggers: pin 3 maps to interrupt 0 (INT0), pin 2 is interrupt 1 (INT1), pin 0 is interrupt 2 (INT2), pin 1 is interrupt 3 (INT3), and pin 7 is interrupt 4 (INT6).
(quoted from: https://learn.sparkfun.com/tutorials/pro-micro--fio-v3-hookup-guide/hardware-overview-pro-micro )
There are other equally affordable boards that have more, this Pro Micro is just designed for much smaller projects. The name brand Arduino Micro shown in the top most image has 6 or 8 interrupts (off the top of my head), but is a bit pricey for a DIY at around $18.
I've found a slightly cheaper version here that has 8 interrupt pins and could handle your modified sketch. Otherwise, if you bought a 3 pack of those just like I did in my DIY, you could get away with (if you have 2 usb ports open on your PC) doing 2 controllers to save money. You'd just use the same sketch but increment the Joystick ID from 0x42 to 0x43. But for $14, might as well do it right, it's up to you. Just remember for future, you can hang on to old gear for new projects later, you never know.
https://www.amazon.com/Gowoops-Arduino-Leonardo-Controller-ATmega32u4/dp/B00J1X5B7Y/
*Leonardo would be required for the total of 3 rotary encoders, as it has enough interrupt pins for the task:
https://www.amazon.com/Solu-Leonardo-Compatible-Revision-Atmega32u4/dp/B00R237VGO/ -
You're welcome!
Adding a third rotation axis is super simple, the joystick library actually has 3 rotation axes and we've only used 2 of them. It's just a matter of adding in that Z axis in the same way we handle the X and Y, and wiring it up to a pair of Interrupt Pins, and it's button to the buttons pin array. Adding a 3-way toggle switch should work just fine as buttons, but I don't have an example I can mash in right now, and so I'll have to look into it tomorrow or this weekend, but I'm sure I can toss something together for you.
You will want to learn how to wire up that 3-way switch and run an example sketch to test it, here's a simple lesson for that - his pics could be better, but you'll get the idea - I can't help you with your wiring, so you'll need to work through this to learn where to wire the resistors, ground, etc. : http://www.lucadentella.it/en/2014/08/01/interruttore-a-tre-posizioni-e-arduino/
For now, I have an example for you with the 3rd rotary encoder (Z axis), look it over and you'll see what I did to add it, it's pretty easy even for a novice because it's literally a copy of X and Y.It does matter what board you are using, this is working example with all three rotary encoders, but not the 3-way switch yet -- this sketch assumes that on your board the 9 & 10 pins are Interrupt pins (refer to the pinout for your board if this sketch doesn't work out of the box). I didn't test it, so you can do that.
https://pastebin.com/gEWNgm83
(click to reveal)
/* Modified HSI Knobs Sketch for Falcon BMS / DCS / FSX
 *  with additional 3rd Rotary Encoder (Z Axis)
 *    *(coming next: a 3-way Toggle Switch add-on)
 *  for Arduino Micro/Leonardo / Sparkfun Pro Micro or equiv. clones
 * by SemlerPDX Aug2019
 * VETERANS-GAMING.COM
 * ( in response to reply at:
 *    http://veterans-gaming.com/index.php?/blogs/entry/32-diy-custom-game-controller-2-dial-hsi-course-and-heading-knobs/ )
 *
 *  Pins:
 *  Rotary Encoder 1 - (OUTA-OUTB-SW) = Arduino Pins (0,1,15)
 *  Rotary Encoder 2 - (OUTA-OUTB-SW) = Arduino Pins (2,3,6)
 *  Rotary Encoder 3 - (OUTA-OUTB-SW) = Arduino Pins (9,10,7)
 *
 *  Encoder Library
 * http://www.pjrc.com/teensy/td_libs_Encoder.html
 *
 *  Joystick Library
 * by Matthew Heironimus
 * https://github.com/MHeironimus/ArduinoJoystickLibrary
 */

#define ENCODER_USE_INTERRUPTS
#define ENCODER_OPTIMIZE_INTERRUPTS
#include <Encoder.h>
#include <Joystick.h>

//Tell the Encoder Library which pins have encoders
Encoder axisXRotation(0, 1);
Encoder axisYRotation(2, 3);
Encoder axisZRotation(9, 10);

//Rotary Encoder Push Button Pins
int buttonArray[3] = {15, 6, 7};

//Rotary Encoder Interrupt Pins
int EncoderPin0 = 0;
int EncoderPin1 = 1;
int EncoderPin2 = 2;
int EncoderPin3 = 3;
int EncoderPin4 = 9;
int EncoderPin5 = 10;

//Delay Time between loops
int debounceDelay = 260;

//Variables to compare current to old values
int oldX = 0;
int oldY = 0;
int oldZ = 0;
int RxAxis_Value = 1;
int RyAxis_Value = 1;
int RzAxis_Value = 1;

//Intervals for Jump/Warp Speed Rotations
int JumpSpeed = 18;
int WarpSpeed = 30;

//Set generic joystick with id 42 with 3 buttons and 3 axes
Joystick_ Joystick(0x42,
  0x04, 3, 0,
  false, false, false, true, true, true,
  false, false, false, false, false);


void setup() {

  //Set Encoder Pins as Pullups
  pinMode(EncoderPin0, INPUT_PULLUP);
  pinMode(EncoderPin1, INPUT_PULLUP);
  pinMode(EncoderPin2, INPUT_PULLUP);
  pinMode(EncoderPin3, INPUT_PULLUP);
  pinMode(EncoderPin4, INPUT_PULLUP);
  pinMode(EncoderPin5, INPUT_PULLUP);

  //Loop through buttons and set them as Pullups
  for(int x = 0; x < sizeof(buttonArray); x++) {
    pinMode(buttonArray[x], INPUT_PULLUP);
  }

  //Set Range of custom Axes
  Joystick.setRxAxisRange(0, 359);
  Joystick.setRyAxisRange(0, 359);
  Joystick.setRzAxisRange(0, 359);

  // Initialize Joystick Library
  Joystick.begin(false);

}


void loop() {

  // Loop through button pin values & set to Joystick
  for (int x = 0; x < sizeof(buttonArray); x++) {
    byte currentButtonState = !digitalRead(buttonArray[x]);
    Joystick.setButton(x, currentButtonState);
  }


  // Read "Heading" X Axis Rotation Encoder Knob
  int newX = axisXRotation.read();
  if (newX > oldX) {
    //Determine speed of increment & set output
    int difX = newX - oldX;
    RxAxis_Value = speedVal(difX, RxAxis_Value, 1);
    Joystick.setRxAxis(RxAxis_Value);
    axisXRotation.write(newX);
    oldX = newX;

  }else if (newX < oldX) {
    //Determine speed of decrement & set output
    int difX = oldX - newX;
    RxAxis_Value = speedVal(difX, RxAxis_Value, 0);
    Joystick.setRxAxis(RxAxis_Value);
    axisXRotation.write(newX);
    oldX = newX;
  }


  // Read "Course" Y Axis Rotation Encoder Knob
  int newY = axisYRotation.read();
  if (newY > oldY) {
    //Determine speed of increment & set output
    int difY = newY - oldY;
    RyAxis_Value = speedVal(difY, RyAxis_Value, 1);
    Joystick.setRyAxis(RyAxis_Value);
    axisYRotation.write(newY);
    oldY = newY;

  }else if (newY < oldY) {
    //Determine speed of decrement & set output
    int difY = oldY - newY;
    RyAxis_Value = speedVal(difY, RyAxis_Value, 0);
    Joystick.setRyAxis(RyAxis_Value);
    axisYRotation.write(newY);
    oldY = newY;
  }


  // Read "QNH" Z Axis Rotation Encoder Knob
  int newZ = axisZRotation.read();
  if (newZ > oldZ) {
    //Determine speed of increment & set output
    int difZ = newZ - oldZ;
    RzAxis_Value = speedVal(difZ, RzAxis_Value, 1);
    Joystick.setRzAxis(RzAxis_Value);
    axisZRotation.write(newZ);
    oldZ = newZ;

  }else if (newZ < oldZ) {
    //Determine speed of decrement & set output
    int difZ = oldZ - newZ;
    RzAxis_Value = speedVal(difZ, RzAxis_Value, 0);
    Joystick.setRzAxis(RzAxis_Value);
    axisZRotation.write(newZ);
    oldZ = newZ;
  }


  //Send Joystick info through USB
  Joystick.sendState();
  delay(debounceDelay);
}


//Function to set Rotation value adjusted for the turning speed
int speedVal(int dif, int val, int dir){
  if (dif >= WarpSpeed) {
    if (dir == 1) {
      val = val + WarpSpeed;
    }else{
      val = val - WarpSpeed;
    }
  }else if (dif >= JumpSpeed) {
    if (dir == 1) {
      val = val + JumpSpeed;
    }else{
      val = val - JumpSpeed;
    }
  }else{
    if (dir == 1) {
      val = val + 1;
    }else{
      val = val - 1;
    }
  }
  //Correct Rotation within 360 deg.
  if (val < 0) {
    val = val + 360;
  }else if (val >= 360) {
    val = val - 360;
  }
  return val;
}

-
I think for the scenario where you are not the lead pilot, but you still want to use the profile so you can talk to Tower/Ground/ATC/etc. there should be a way to disregard comms that may try to trigger such calls.
Should I have a mode that we tell AVCS we are not the lead pilot, and therefore a certain set of commands will not trigger even if we directly call them? That would not be difficult, but we would want to compile a list of all commands that logically should be ignored if we're not the lead in a flight online with humans.
An alternate on this method would be to set only one PTT (for example, UHF) and use that for AI comms primarily, and the VHF for inter-ship Player to Player comms. The PTT mode does not require both keys to be set, just the Press & Release for VHF -or- UHF would suffice.
The way you propose an alternate use of PTT mode might possibly get more in the way than anything, if I could make it so you don't have to do work like another simple mode which could be made to handle this type of flight, it may be preferable. I hadn't thought about this, much appreciated!
-
A small bug has been found, the Keyboard Layout is not remembering it's settings when the profile is reloaded because the variable didn't get loaded in the initialization file as intended. This will be fixed for the final version. If you use a different keyboard layout than the default QWERTY, and you don't want to have to set this each time this profile loads until the next update, you can simply add the line to the KEYPRESS_Variables command as shown in the image below. Copy the variable AVCS_BMS_KeyboardLayout and insert a 'Set an Integer Value' found under "Other > Advanced" and paste in the variable name. Below, select the box "Retrieve Saved Value" and nothing else.
Again, this will be done for the final version, and only people with non-standard keyboards need to be concerned.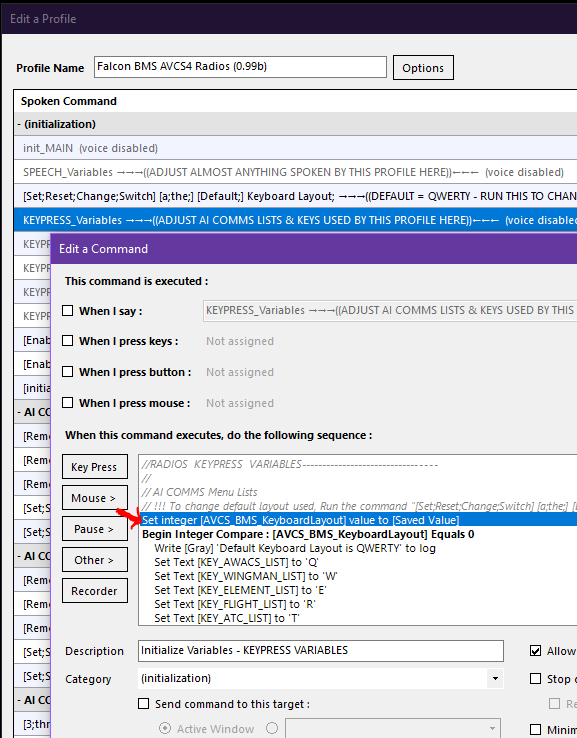
-
BETA UPDATED TO v0.99 (final beta!)
Please download newest version! Link below and updated in the main post above! You don't have to remove the 0.98 beta profile, but it is recommended to not use both at the same time or variables may get messed up. Thanks to everyone for helping to finish up final testing!
SitRep:
I've finished integrating the proposed changes I received through the v0.98 beta, and the v0.99 beta is now available for download (click here). There is now an alternate All-Humans Mode that can be turned on, and will assume all pilots are humans unless you individually set Computer Pilots per callsign/flight/wing numbers. All the same "Set a Human Pilot" commands have been copied to make "Set a Computer Pilot" equivalents.You can also change the Keyboard Layout from the default QWERTY by voice command or just executing the "change" command found under initialization.
Per request, to speed up the interaction of adding/removing pilots from the exclusion lists, you can now say the entire Callsign + Flight Number + Wing Number when asked for the callsign.Example:
"Set a Human Pilot"
"say the callsign"
"Cowboy 7 3"
"Cowboy 7 3 - is this correct?"
"Yes"
...
(bypassing the need to individually set Flight Number and then Wing Number!)This will jump to the confirmation at the end of the command and greatly reduces the time spent interacting with the voice control system configuration. During my testing, I found there must be a clear separation between the Flight Number and Wing Number when spoken, to avoid "Cowboy 7 3" getting recognized as "Cowboy 73", and your own results may vary. Please test and let me know. The old system is still in place, and you can even just say the Callsign + Flight number, and it will notice and skip to the Set Wing Number segment of the script. The entire idea was to allow a lot of options to recognize how we speak, and the only catch is that we need to enunciate and keep succinct breaks between words for this style of input. Further beta testing in this final 0.99 phase should help judge if this will work or if it needs adjustment.
Additionally, there are now VoiceAttack command log notifications whenever the profile loads showing the current profile settings, and also voice notifications if either PTT mode or the new All-Humans mode are On.
Here's a copy of the changelog:
Beta v0.99 Changelog Jul2019
New Commands:
 -Change Default Keyboard Layout allows choices between QWERTY, QWERTZ, & AZERTY (per user request)
 -Turn On/Off All-Humans Mode : Reverse mode assumes all pilots are humans, add Computer Pilots individually as needed (per user request)
 -Copy of all Add/Remove Human Pilots commands for Computer Pilots & All-Humans Mode

Fixes/Improvements:
 -Can state an entire callsign plus flight & wing numbers when asked for Callsign (per user request to speed up the voice system interaction of adding/removing human pilots)
 -VoiceAttack log entries displays profile information on startup (current keyboard layout, push-to-talk mode on/off state, All-Humans mode on/off state) (per user request)
 -Speech notifications on startup for PTT mode and All-Humans mode if they are enabled (see above)
 -Forced profile initialization if not initialized on any command use (per bug report: on first download/import of profile, trying to use any command fails until voiceattack restarted)
*wheelchock2 had asked about a query system. I have not made a system to ask which callsigns have been set/saved to either a Human Pilot or Computer Pilot, as it was always designed to be a throw-away use concept, add a few for the afternoon, adjust for different flights, reset at the end or beginning of a days' use of Falcon BMS. I'd like to know if there is serious interest in a query system before I create one as it will add a bit of size to the profile, increase it's RAM footprint further, and possibly increase profile load time even further. It would not make sense to add this if there is too little use for it. Personally, I remove all human pilot callsigns before every flight, when I'm at the 2D map/mission planning phase. Please let me know how you guys use the profile, and if you'd use something like a query system.
-
 1
1
-
-
SitRep:
I have several great suggestions and will be working on adding several of these ideas to the next working beta (0.99b), if possible. My release plan is simply this beta, and the 0.99b beta, for a few weeks until VoiceAttack beta that we are using gets it's own release, and then I'll add any final changes and polish, and release it as a version 1.0 - I don't expect much need for editing in future unless the radio menus get changed again, but will maintain the profile and entertain any useful suggestions even after final release.If anyone has any other suggestions, feel free to let me know! Thanks for all the feedback so far!
-
1
-
-
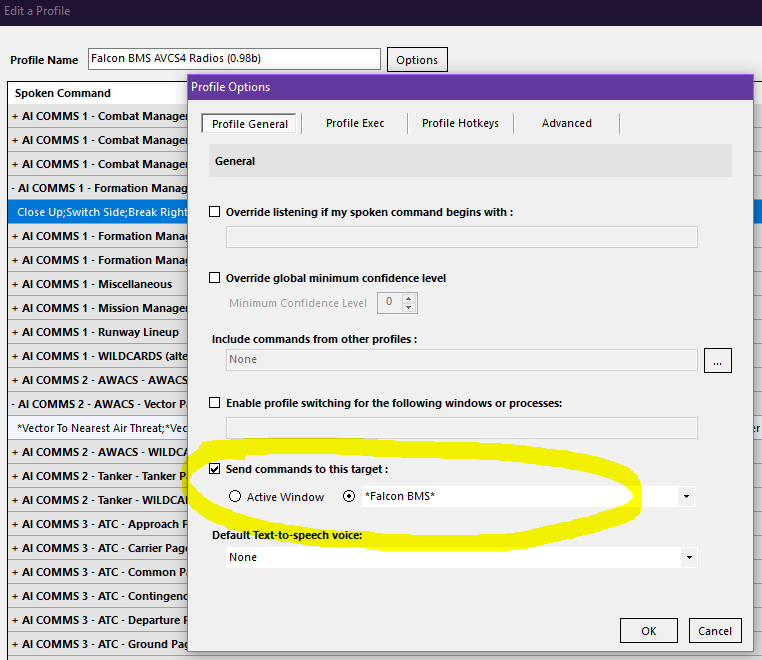
*For anyone with issues, per a message I received about keys not getting through:
You can ensure that keys are getting sent to the application by opening the VoiceAttack Profile, and clicking on Options along the top, and select "Send commands to this target" and then write in *Falcon BMS* between asterisks (*) for a wildcard catchall for the BMS game window.This will ensure these keystrokes go where they are needed. See image:
-
Thanks for the feedback! If people prefer English for VoiceAttack, there is no sense to waste time on localization.
I believe I can include an option for QUERTY or AZERTY.
Is this correct?
// AI COMMS Menu Lists Set Text [KEY_AWACS_LIST] to 'A' Set Text [KEY_WINGMAN_LIST] to 'Z' Set Text [KEY_ELEMENT_LIST] to 'E' Set Text [KEY_ATC_LIST] to 'T' Set Text [KEY_FLIGHT_LIST] to 'R' Set Text [KEY_TANKER_LIST] to 'Y' -
Thank you very much! (It's my profile, not Kavelenko
") - lost in translation, I'm sure, don't worry about it!)
- lost in translation, I'm sure, don't worry about it!)
I had a feeling that the profile may look odd, all of my AVCS4 profiles follow a similar format, and must be grouped by category in order for the list to look correct. By consolidating multi-part commands, and collapsing all categories, it should begin to appear much more ordered. I enjoy placing as much as possible into "initialization" scripts so that if I change anything later, I can make changes in one place. If you look inside most of the commands like "go stack;go spread;..." their content is almost exactly the same as the next or previous commands, and again, this makes it very easy to expand or edit in future if needed.I would love to work with someone to add localization to this profile! If we could translate my command words into French, and if Windows Voice Recognition and VoiceAttack both work in the French language, it would be very easy to modify this profile. Again, all speech variables are in one file, so anything spoken by the profile can be changed to any language without hunting for them throughout the profile. And editing the commands themselves would let you change any of the command words to French equivalents. Proper nouns would likely remain the same, of course, OR you could change ALL callsigns in the profile to different ones if you edit the .vap and find/replace all. I'll include a readme with instructions on changing/adding callsigns to the .vap profile file before the beta is finished.
If anyone would like to help with localization, RSVP-
 1
1
-
-
I've read this like twenty times since you posted (I think it's finally sinking in), figured I'd comment and say thanks! A lot of new stuff in BMS 4.34 - this helps a lot! Cheers!

-
14 hours ago, =VG= Kavelenko said:
OMFG! More shit I gotta learn rofl.
I agree - when they changed up the radios and radio menus for 4.34, I started by taking pics of all of them (the bottom graphic) just to wrap my head around the changes. Then I built this voice control profile so I didn't have to memorize anything (except those 5 "add/remove hoomans" commands). To use this profile myself, I have that bottom image on my tablet or phone just as an image reference so I can see "what" I can ask of AWACS or other contacts, in case something is new. I certainly don't know everything by memory myself, but I also don't find that I use everything in every flight. I definitely use the AWACS and ATC stuff a lot, and the ATC has really changed! A little learning is half the fun of a sim, right? haha!
I'm relying heavily on Jeffu's blog post here to figure out these new features in Falcon BMS 4.34:
-
Great info!
-
1
-
-
Very cool!! Nice job, bro!
-
1
-
-

Sav said he'd give it some time when he gets back from his vacation in a week.
-

I am looking forward to that game "Squad" -- it's being developed by PR Dev's AFAIK it's not finished yet. Might be a great team game. Also that Insurgency seems nice as well.
-
1
-
-
We love our VG home!

-
1
-


DIY - Custom Game Controller - 2 Dial HSI Course and Heading Knobs
in Profiles for VoiceAttack & other projects
A blog by =VG= SemlerPDX in General
Posted
*Now that I thought about it, I wonder if you need all the functions of the HSI buttons (Warp Speed/Jump Speed) and could go analog with the QNH, 1 step at a time, with a different method. I'll think about it over the next few days. It's a matter of talking to the encoder library or joystick library in some way to enact a change, and within those two libraries there may be functions to get around the interrupts, I just didn't do it for my method.
We'll see.
Some additional reading I'll review, you might too, on Rotary Encoders: https://dronebotworkshop.com/rotary-encoders-arduino/