
Search the Community
Showing results for tags 'falcon bms'.
Found 20 results
-
untilMost every Weekend, we will be meeting up for a mission or two at 11:00:00 ZULU on Sundays. If you are unsure what ZULU time is in your country, check the game clock on the homepage of Veterans-Gaming. If the clock reads 11:00:00 ZULU, check in at our BMS Discord channel. We're usually hanging out in the "Pilot Lounge" voice channel. If you'd prefer to just watch what we're doing just join the voice channel and we'll stream the session. HOW GOOD DO I NEED TO BE TO FLY FALCON BMS? (Minimum requirements: if you can ramp start, take off and land safely you're good you can probably join our flight and do ok). Our goal is to train and practice in Falcon BMS together online on the active VG server. Everyone is welcome, contact us if you have any questions prior to the training session. Most of our discussions about this server happen on VG Discord, in the BMS channel. If you're interested in A-A Combat a good place to start is by completing the BMS Training Missions - 17, 18 & 19. If A-G missions are your bag, its useful to have completed BMS Training Missions - 10,11,12,13,14,15 & 20. What is ZULU time? ZULU is the military term for Greenwich Mean Time (GMT). Due to different time zones around the world, pilots need to translate ZULU to their local time. Here is a list of typical time zones for 11:00:00 ZULU. Download a time zone converter to your phone or browser at: https://www.timeanddate.com Next Training Session ================== Mission Objective: Join Us in the Dynamic Campaign. Be prepared for anything. ========================== CONTACT: =VG= Kavelenko
-
Version 1.43
9,412 downloads
*Please be sure to download the AVCS CORE Profile from this download section as well, it is now a requirement for any AVCS4 game profile I release, such as the upcoming Elite Dangerous profile, and more... *Originally, this was designed for Falcon BMS version 4.34 - since then, it has always been and will continue to be updated to work with the latest version of Falcon BMS. Pro tip: never include a game version in URL's or graphics Profile for VoiceAttack by =VG= SemlerPDX Description: These commands use VoiceAttack to translate the in-game on-screen radio menus from AWACS through Tanker into natural and intelligent voice command phrases that will fire keypress macros to help keep hands on the throttle and stick, and maintain immersion. As an additional option, these commands can be locked behind a push-to-talk mode bound to your UHF/VHF transmit buttons in-game, allowing any other VoiceAttack command unrestricted access if needed, while still restricting these BMS radio command macros. Finally, this single advanced control profile is extremely easy to edit or integrate into other profiles. At VETERANS-GAMING, we fly with friends or AI Pilots, or a mix of both on our 24/7 Public Korean Campaign in Falcon BMS. We may go out with an AI wingman only to have a friend take their place mid-flight. For this reason and others, I created this VoiceAttack profile based around restricting when the computer can execute keypress macros that match voice phrases, having to first check if that pilot was set to a human pilot and therefore disregard commands for that pilot. Thanks to user requests during the beta, there is now an optional mode to reverse the Human Pilots system, to assume all pilots are humans unless told otherwise, and also a system to choose a different keyboard layout than QWERTY. I have also added an optional Audio Feedback Mode to play a short radio cue sound when a command is successfully recognized. Included is a single profile that handles every callsign and radio command variation in Falcon BMS, with instructions on how to add any custom callsigns to the single profile. The focus of this profile is only on the in-game Radio Menus, and creating an immersive interaction layer through VoiceAttack that is easy to manage and update, or integrate into other Voice Control systems for Falcon BMS. My goal was an intuitive system, so there is no user manual - only a few infographics and quick reference pic of all the radio commands. I personally keep that final pic on my tablet for reference when flying, to find radio commands I seldom used in the past when they were more difficult to access while busy with HOTAS in the pit. Say goodbye to the keyboard, and enjoy the immersion! Cheers! Features: see full details in post ↓ Sample Pics: https://imgur.com/a/xuclI0a (download file contents)- 5 comments
-
- 4
-

-
- avcs4
- voice control
- (and 4 more)
-

DIY - Wireless TrackClip Pro mod for TrackIR
=VG= SemlerPDX posted a blog entry in Profiles for VoiceAttack & other projects
I bought a Logitech G933 wireless headset last year and I'd like to make my TrackIR TrackClip Pro into a wireless unit as well. I need to be able to remove it from the G933 when not in use, TrackClip Pro's break if you look at them too hard, so taking it off is a primary requirement. I'll want to be able to recharge it with the same cord the G933 uses, too. I'm not a pro at this stuff, so any thing that works well and doesn't cost too much will be just fine with me. I know that if I ramp up the voltage from one single 3.7V battery, I can achieve 5V @ 1A for the 3 LED's on the TrackClip, and should retain a duration of more than 4 hours (overly hopeful estimate). I'll need to do some testing, if I have to, I'll use the second 3.7V battery like in the image here just for longer time between charges. My DIY TrackIR "Wireless Rechargeable" Track Clip Pro mod *parts list with links at bottom The initial goals I had once I began were: Tiny form-factor, less than 5cm long, less than 2.5cm wide & tall Can power TrackClip for between 4-8 hours continuously Tiny on-off slider switch Rechargeable via micro-A USB female plugin Output to TrackClip via USB (type A) female outlet plug (as in picture above) Encased in semi-rigid form like shrink wrap, adapted plastic case, or custom 3D printed plastic case Velcro strap to easily mount on headphones Total cost for one single powerpack unit less than $10 USD Soldering leads to the TP4056 (03962A) Charging Board with Protection. This is the brains of this unit, and will make sure the rechargeable 3.7V battery will not discharge past 2.5V and will not recharge over 4.2V. It acts as the buffer between the battery and the voltage booster. Here is the 03962A Charging Board and battery holder wired to the MT3608 DC to DC Step Up Boost Converter. I did this for initial testing and to set the trim-pot (blue square box with round brass peg) on the boost converter from the 18V setting it shipped with to the 5V that I need. It will take the 3.7 Volt battery and step up its voltage to something usable by the TrackClip Pro without the need for a second battery. Trying to keep the size small, mounting the breakout boards close together makes it about the size of a stick of gum, plus the AAA sized battery. I put a USB female plug in for size reference along with the Bic lighter. The 10440 is a 3.7 Volt Lithium Ion rechargeable battery in a AAA size. According to a features sheet on a batteries info website, "Lighter weight and higher energy density than any other rechargeable battery". I'll be ramping up it's voltage to a full 5V. I used a portion of shrink wrap tubing around the 03962A Charging Board on the left, and MT3608 Boost Converter on the right is hot glued to the battery holder and to the 03962A in the middle. Through the shrink wrap I cut holes for the LED indicator lights on the charging board. The tiny switch has a pin through the breakout board and is soldered in place, with another pin bent and wrapped around the edge of the board, and soldered to it's wire (I didn't have red shrink wrap, but the thicker top right wire is the load line, and is red under there). Even with all of that, I just don't trust tiny switches to stay in place and solder is not structural, so it got a healthy dose from the hot glue gun. As you can see, I've used the highly skilled technique known as "just glob it on". I've cut the cord on the Track Clip Pro, spliced the wires to the Boost Converter, and used shrink wrap tubing to contain the entire unit. I've left a bit of the wire jacket hanging below the wires and hot glued in place, and then shrink wrapped under a little tension. This causes a slight bend in the wire, shown in these pics and it helps the unit bend the newly magnetic end inwards to the screw under this panel. A NetDot micro-USB magnetic adapter makes connecting a charging cable easy, and gives one end of my battery pack a strong magnet to work with. The NetDot magnetic charging adapter is so strong it is very well stuck to the screw on the corner of the G933 headset under the panel. It doesn't come off and swing around when I move my head around, and that's all that really matters to me. Function before looks. It's finally finished and working great! I expect it will last for a few years before I'll want to carve off the outer shrink wrap and replace the 10440 battery, and seal it back up with a new shrink wrap tube (and some new cut-outs for the switch and lights). Here's a cost breakdown: NetDot Magnetic Bi-Directional microUSB Plug Adapters https://www.amazon.com/NetDot-Generation-Magnetic-Adapter-Compatible/dp/B076QC2RQT/ $4 (per male/female adapter pair) TP4056 (03962A) Charging Board with Protection MT3608 DC to DC Step Up Boost Converter (in a pack with 3 of each board, plus 5 battery holders) https://www.amazon.com/dp/B07NHHCNNQ $1.00 per breakout board The battery holder I used was actually the AAA type: https://www.amazon.com/gp/product/B07C2XT5C5 $0.58 (one) 3.7V 10440 AAA Lithium Ion Rechargeable Battery (x4 @11.69 - w/Charger $19.09)*(note: these are NOT AAA batteries! They must be charged with a special charger, and shouldn't be used for normal AAA battery powered devices!) https://www.amazon.com/10440-Rechargeable-Lithium-Battery-350mah/dp/B010ABNW5S/ (or) https://www.amazon.com/10440-Lithium-Rechargeable-Battery-Charger/dp/B06X9TZ1CG/ $2.92 / battery Tiny switch with nice long legs (they come in a pack of a hundred for six bucks): https://www.amazon.com/Cylewet-Vertical-Switch-Arduino-CYT1016/dp/B01N7NCW8N/ $0.06 (one) (Not taking into account things like hot glue sticks, solder, tape, or shrink wrap tubing segments used because they cost less than a few pennies) Total: $9.56 (USD) _________________________________ Looking back to the start, I've met my goals or caused some to become redundant (like velcro) and the cost for this single battery unit was less than $10, though I do have enough parts to make 2 more, I'm happy to put those in my Arduino projects bins and eat the costs there. This thing cost me about ten bucks, it works well, and I also have another $26 in extra parts (NetDot's and 3.7V batteries, battery holders, charging and boost breakout boards...). I learned a bit about larger shrink wrap tubing, it only shrinks so far. And I think it was all worth it. Had a flight earlier, with 8 minutes to taxi, I just got up out of my PC chair from a hot pit, and walked over to the fridge to get a soda all without taking off my headset or TrackClip Pro, strolling around while listening in to the Tower and waiting for my clearance to taxi. It was a feeling of true freedom! If anyone has any questions on this mod, I'd be happy to help if I can. See you at Angels 20!- 7 comments
-
- 6
-
-

-
- trackclip pro
- rechargeable
- (and 6 more)
-
I have a touch screen monitor below my main one when I fly in flight simulators like Falcon BMS or DCS or Microsoft Flight Simulator. It's great for the MFD buttons, as opposed to the actual wired USB Thrustmaster MFD's physically attached to the screen like I used to have, and I can use the monitor for other things, too. But one thing I would love to have attached to the screen would be the Course and Heading knobs of the HSI (horizontal situation indicator) . It would need to be removable so I can store it when not in use. I've heard about a micro-suction tape that can stick to anything smooth and flat without leaving a residue or losing stickiness, so this is a good excuse to buy some and play around with sticking things to my monitors. ← On the left is the (green) Arduino Micro board I used to test the concept with a rotary encoder on a breakout board, where I wrote the initial sketch with the Joystick and Encoder libraries. Later, because I didn't want to sacrifice my Arduino Micro to this controller, I bought a 3 pack of these much smaller Sparkfun Pro Micro clones for fifteen bucks (blue one in the middle). That one is gonna stay there for future tests and such, they'll be the heart of many projects in the future since they cost so little and include so much! My DIY USB Game Controller - Rotary Encoders as Course & Heading Knobs for Falcon BMS / DCS / FSX *parts list with links at bottom The initial goals I had for this project were: Two Rotary Encoders with Push Buttons recognized as USB Game Controller in Windows Thin and flat, without taking up too much viewing space on the monitor Can stick and restick to the monitor with micro-suction tape USB connector can be removed so it can be boxed (NetDot magnetic) Fine control for one-degree per detent and Fast Speeds for turning quickly Encased in semi-rigid form like shrink wrap so it won't scratch the monitor Total cost for one single unit less than $10 First, I affixed the Rotary Encoders and the Pro Micro clone to an 8cm x 2cm prototype PCB with a couple header pins bent outwards and crimped down, and with the two blue solid copper switch wires soldered in place from the top. I also ran the 10k Ohm resistors for the switches now. These are for the push buttons built into the rotary encoders, and although they only have two pegs on the actual component, they require three wires from the controller board (ground, 5 volt power, and the blue switch wire going to the Pro Micro). All this added plenty of structure. There is no wiggle or play, I'm not gonna try to break it, but it is very rigid now. Here's a close look at the first stage of soldering. (okay, don't look too close) I don't have the highest quality tools or solder, or even a lot of skill and experience at this, but it's good enough -- and good enough should always be good enough for a DIY project for personal use. If I wanted to, I could order a custom circuit board if I was going to make a bunch of these, but I'm happy as it is. It is so cheap to buy some of this stuff, if you messed up, you can always just buy another. Those Pro Micro controller boards cost about as much as a value meal at a fast food joint, so you can literally afford to make mistakes as you learn even if you're on a very tight budget like I am. A homemade carbon filter fume extractor, a simple soldering iron with a power switch and a temperature controller, some handy dandy helping hands and that brass soldering tip cleaner make little projects like this very easy, and all these items together costs less than the Logitech mouse to it's right. Good enough to play. If anyone reading this has any idea to get into working with things like this, my advice is to jump right in, get the most basic stuff you can get, not the cheapest, but things with good reviews from some good online store like Amazon, Sparkfun, Adafruit, etc. Soldering the top side here, used one of the helping hands to hold a string of solder from the spool. When I'm dealing with tiny bits that are between 0.5mm-2mm, anything that helps is appreciated. One slip and this 225C soldering iron would burn through any one of those tiny chips or components on the board. I find myself holding my breath and doing one or two, then letting go for a sec. I had to redo a few, and I always wait for it to cool down so I don't transfer too much heat to this poor little board. I had a few bits of solid copper wire with colored insulators, from a breadboard jumpers kit, so I cut some to length, but used others as is. This resulted in an odd looking crossover of the Orange and Yellow wires, but they are not taller than the micro USB port on the other side of the board and that's fine. Once I was all done, I tested every connection for continuity and unintentional bridges, and it all checked out, so I encased it in shrink wrap. By some sort of miracle, it works, it looks decent, and I think that will do just great! I connected it to the computer and uploaded the sketch, which I had to modify slightly since I used a few different pins for the push buttons on the rotary encoders, now at pins 15 and 6 instead of 6 and 7. I am thoroughly hooked on these NetDot magnetic adapters. When I looked at the reviews for Pro Micro boards, one of the only issues I saw that I'd be concerned with is accidentally popping the micro-USB port off the Pro Mini board if dropped or yanked too hard. A magnetic connector completely eliminates this issue, as well as the standard wear and tear issues that plugging and unplugging creates over time. And they're as cheap as regular braided USB cables, too. Why not? Here it is connected to the touchscreen monitor. It is far more satisfying to have tactile dials for these knobs than trying to make little circles on the screen with my finger over the touchscreen dials. The micro-suction tape keeps it in place and actually has some grab when trying to pull it off the screen. I've started using a peeling action but I doubt the screen would ever have problems. I might get a 3D printed case someday and maybe even a 90 degree angle connector so the cord goes back behind the monitor naturally instead of downwards, but for now, it's done and working great. Turning the dial with the most basic rotary encoder sketch from that Arduino library results in a "one degree per detent" meaning one turn is one click, and one click is one degree. No matter how fast you turn it, with 20 detents per 360 degrees with these encoders, it would take FOREVER to turn the dial from heading 000 to 180!! I wrote two separate jump speeds to detect how fast the dial is being turned, one jumps 18 degrees per click, and the other 30 per click. Now, it's easy to twist the dial fast to get it spinning fast on screen, while also being able to dial in one degree at a time when needed. All in all, it was a fun project and it's made me think seriously about getting a 3D printer someday to make little plastic cases for things like this. Here's the code if someone wants to use it (or modify it to make it better): Rotary Encoders HSI Course and Heading Knobs.ino for Arduino IDE https://pastebin.com/drUnCfKN /* Simple HSI Knobs Sketch for Falcon BMS / DCS / FSX * for Arduino Micro/Leonardo / Sparkfun Pro Micro or equiv. clones * by SemlerPDX June2019 * VETERANS-GAMING.COM * * Pins: * Rotary Encoder 1 - (OUTA-OUTB-SW) = Arduino Pins (0,1,15) * Rotary Encoder 2 - (OUTA-OUTB-SW) = Arduino Pins (2,3,6) * * Encoder Library * http://www.pjrc.com/teensy/td_libs_Encoder.html * * Joystick Library * by Matthew Heironimus * https://github.com/MHeironimus/ArduinoJoystickLibrary */ #define ENCODER_USE_INTERRUPTS #define ENCODER_OPTIMIZE_INTERRUPTS #include <Encoder.h> #include <Joystick.h> //Tell the Encoder Library which pins have encoders Encoder axisXRotation(0, 1); Encoder axisYRotation(2, 3); //Rotary Encoder Push Button Pins int buttonArray[2] = {15, 6}; //Rotary Encoder Interrupt Pins int EncoderPin0 = 0; int EncoderPin1 = 1; int EncoderPin2 = 2; int EncoderPin3 = 3; //Delay Time between loops int debounceDelay = 260; //Variables to compare current to old values int oldX = 0; int oldY = 0; int RxAxis_Value = 1; int RyAxis_Value = 1; //Intervals for Jump/Warp Speed Rotations int JumpSpeed = 18; int WarpSpeed = 30; //Set generic joystick with id 42 with 2 buttons and 2 axes Joystick_ Joystick(0x42, 0x04, 2, 0, false, false, false, true, true, false, false, false, false, false, false); void setup() { //Set Encoder Pins as Pullups pinMode(EncoderPin0, INPUT_PULLUP); pinMode(EncoderPin1, INPUT_PULLUP); pinMode(EncoderPin2, INPUT_PULLUP); pinMode(EncoderPin3, INPUT_PULLUP); //Loop through buttons and set them as Pullups for(int x = 0; x < sizeof(buttonArray); x++) { pinMode(buttonArray[x], INPUT_PULLUP); } //Set Range of custom Axes Joystick.setRxAxisRange(0, 359); Joystick.setRyAxisRange(0, 359); // Initialize Joystick Library Joystick.begin(false); } void loop() { // Loop through button pin values & set to Joystick for (int x = 0; x < sizeof(buttonArray); x++) { byte currentButtonState = !digitalRead(buttonArray[x]); Joystick.setButton(x, currentButtonState); } // Read "Heading" X Axis Rotation Encoder Knob int newX = axisXRotation.read(); if (newX > oldX) { //Determine speed of increment & set output int difX = newX - oldX; RxAxis_Value = speedVal(difX, RxAxis_Value, 1); Joystick.setRxAxis(RxAxis_Value); axisXRotation.write(newX); oldX = newX; }else if (newX < oldX) { //Determine speed of decrement & set output int difX = oldX - newX; RxAxis_Value = speedVal(difX, RxAxis_Value, 0); Joystick.setRxAxis(RxAxis_Value); axisXRotation.write(newX); oldX = newX; } // Read "Course" Y Axis Rotation Encoder Knob int newY = axisYRotation.read(); if (newY > oldY) { //Determine speed of increment & set output int difY = newY - oldY; RyAxis_Value = speedVal(difY, RyAxis_Value, 1); Joystick.setRyAxis(RyAxis_Value); axisYRotation.write(newY); oldY = newY; }else if (newY < oldY) { //Determine speed of decrement & set output int difY = oldY - newY; RyAxis_Value = speedVal(difY, RyAxis_Value, 0); Joystick.setRyAxis(RyAxis_Value); axisYRotation.write(newY); oldY = newY; } //Send Joystick info through USB Joystick.sendState(); delay(debounceDelay); } //Function to set Rotation value adjusted for the turning speed int speedVal(int dif, int val, int dir){ if (dif >= WarpSpeed) { if (dir == 1) { val = val + WarpSpeed; }else{ val = val - WarpSpeed; } }else if (dif >= JumpSpeed) { if (dir == 1) { val = val + JumpSpeed; }else{ val = val - JumpSpeed; } }else{ if (dir == 1) { val = val + 1; }else{ val = val - 1; } } //Correct Rotation within 360 deg. if (val < 0) { val = val + 360; }else if (val >= 360) { val = val - 360; } return val; } Here's a cost breakdown: Pro Micro (clone of Sparkfun Pro Micro board sold by KeeYees) (3 pack) - $15.99 https://www.amazon.com/gp/product/B07FXCTVQP/ $5.33 per board PCB Prototype Board Kit - $15.99 https://www.amazon.com/gp/product/B07CK3RCKS/ $0.25 (just a guestimate - it's one part out of a huge kit) 360 Degree Rotary Encoders (5 pack w/knob caps) - $8.89 https://www.amazon.com/gp/product/B07DM2YMT4/ $3.56 for 2 dials Microsuction Tape (25cm X 30cm Sheet) - $14.95 https://www.amazon.com/gp/product/B00M7FC1K8/ $0.12 (just a guestimate - used 1.5cm x 6cm strip of a huge sheet) NetDot 5ft Braided Magnetic Tip USB Micro Cable (3 pack) - $13.90 https://www.amazon.com/gp/product/B074TB8XTL/ $4.64 for 1 cord (Not taking into account things like double sided sticky tape, solder, wires, or shrink wrap tubing segments used because they cost less than a few pennies) Total: $13.65 (USD) _________________________________ I spent a fair bit more money than I initially expected to (almost $55!), but much of that went towards components or materials that I'll be able to use for several projects in the future. At about $14 bucks, it is twice what I thought it would be per unit, so that will help me to better gauge other ideas. It seemed like it would be cheap as dirt, using many parts I already owned, but it all adds up - they don't sell less than a sheet of micro-suction tape, and buying control boards in bulk is the only wise way to do it (if you can call 3 units "bulk", that is). In conclusion, it was great to have an idea, play around with some proof of concepts, and then make it into a reality within a few days. Single game controllers today.... one day, a full cockpit of switches! Not sure what my next project will be, but among other ideas, I've considered making a custom control board for Kerbal Space Program, or maybe some kind of wireless gear that can connect to a computer and translate into RF to control some DIY RC cars or whatever with my Xbox controller already attached to my PC. Eventually, I want to get into wireless stuff, and even RC, but I might start with button boards that use USB cables just like this one. If anyone has any questions on this project, feel free to ask. Thanks for reading!
- 42 comments
-
- 5
-
-
- dcs
- game controller
- (and 8 more)
-
*Originally, this was designed for Falcon BMS version 4.34 - since then, it has always been and will continue to be updated to work with the latest version of Falcon BMS. Pro tip: never include a game version in URL's or graphics Profile for VoiceAttack by =VG= SemlerPDX Description: These commands use VoiceAttack to translate the in-game on-screen radio menus from AWACS through Tanker into natural and intelligent voice command phrases that will fire keypress macros to help keep hands on the throttle and stick, and maintain immersion. As an additional option, these commands can be locked behind a push-to-talk mode bound to your UHF/VHF transmit buttons in-game, allowing any other VoiceAttack command unrestricted access if needed, while still restricting these BMS radio command macros. Finally, this single advanced control profile is extremely easy to edit or integrate into other profiles. At VETERANS-GAMING, we fly with friends or AI Pilots, or a mix of both on our 24/7 Public Korean Campaign in Falcon BMS. We may go out with an AI wingman only to have a friend take their place mid-flight. For this reason and others, I created this VoiceAttack profile based around restricting when the computer can execute keypress macros that match voice phrases, having to first check if that pilot was set to a human pilot and therefore disregard commands for that pilot. Thanks to user requests during the beta, there is now an optional mode to reverse the Human Pilots system, to assume all pilots are humans unless told otherwise, and also a system to choose a different keyboard layout than QWERTY. I have also added an optional Audio Feedback Mode to play a short radio cue sound when a command is successfully recognized. Included is a single profile that handles every callsign and radio command variation in Falcon BMS, with instructions on how to add any custom callsigns to the single profile. The focus of this profile is only on the in-game Radio Menus, and creating an immersive interaction layer through VoiceAttack that is easy to manage and update, or integrate into other Voice Control systems for Falcon BMS. My goal was an intuitive system, so there is no user manual - only a few infographics and quick reference pic of all the radio commands. I personally keep that final pic on my tablet for reference when flying, to find radio commands I seldom used in the past when they were more difficult to access while busy with HOTAS in the pit. Say goodbye to the keyboard, and enjoy the immersion! Cheers! Features: *Push-To-Talk mode disabled by default. Say, "Turn On Push To Talk Mode" to enable Download: (Click Here) Tips for this profile: (click here to view tips) *On first import, you should say, "Initialize Profile" - after first time, this is automatic. Any attempt to use commands before this will trigger auto-initialization. If you get errors from my profile, Launch VoiceAttack and open Options (wrench icon in lower right): -Under last tab on top, System/Advance, check box next to "Use Nested Tokens" as in image 1 below -Unless absolutely required, during testing it's recommended to uncheck "Allow command segment info for composite commands" Open the profile - if not already done, group commands by category and consolidate multi-part commands as in image 2 & 3 below Click on the Description tab at the top to help sort commands further (see image 4) Read a semicolon ";" as the word "or" and look at long commands as having many options like saying "2;Two;Too;To;Wingman" (read as "2 -or- Two -or- Too -or- To -or- Wingman") Commands Reference: *Replace the word "Human" with "Computer" when All-Humans Mode is ON Normally, this profile assumes all pilots are Computers, use All-Humans Mode to invert this Say, 'Open the Command Reference', anytime to view available voice commands
-
I write this so we have something to point new people to. This will be a quick how-to regarding keybindings for players new to BMS and unsure of what controls need to be bound. Also explained will be a vital control mechanic in BMS known as the Pinky Shift button, and how this will help you when you don't have $500 to blow on a new stick. Anybody used to a universal "do this" buttons as found in any normal video game needs to know that every in-game control mimics a control in the real F-16, and many of them serve multiple purposes. Attached in image format is a list of buttons on the real F-16 HOTAS, their functions and their in-game callbacks. For those who don't yet know what the above is and what it means for you, below is a basic rundown of callbacks, how important they are and what they do. As I rarely use the keyboard, I can't say what the keyboard binding for any of these would be. For those with not enough buttons it's perfectly fine to put things wherever you want them, as long as they're easy to remember and (preferably) make sense logically: Vital keys: SimTriggerSecondDetent = Gun SimPickle = Weapon Release SimTMSUp = Target Select / "Do" button SimTMSDown = Target Deselect / "Undo" Button SimDMSDown = Switch SOI (Switch MFD) SimMissileStep = Change weapon / pylon / bombing mode SimRadarElevationUp = Raise Radar Altitude SimRadarElevationDown = Lower Radar Altitude SimDropProgrammed/SimCMSUp = Drop countermeasure prgms. 1-4 SimToggleMissileCage = Cage / Uncage Sidewinder seeker, remove maverick cover SimHotasPinkyShift = Zoom / change FOV when press, acts as shift button when held SimCMSRight = ECM Standby SimCMSDown = ECM Consent SimSelectSRMOverride = Dogfight override mastermode SimDeselectOverride = Cancel override Hat Switch: SimCursorUp = Radar cursor SimCursorDown SimcursorLeft SimCursorRight (Recommendation) Shifted Hat Switch: SimTransmitCom2 = Transmit VHF Radio SimTransmitCom1 = Transmit UHF Radio SimCommsSwitchLeft = A-A Datalink Transmit (not as important for beginner) SimCommsSwitchRight = A-G Datalink Transmit (not important for beginner) Brakes: SimWheelBrakes = Wheelbrakes (K by default) AFBrakesToggle = Toggle airbrakes Or: AFBrakesIn = Airbrakes retract AFBrakesOut = Airbrakes extend Useful, not vital: SimDMSLeft = Cycle left MFD pages SimDMSRight = Cycle right MFD pages SimSelectMRMOverride = Missile override mastermode, for quick A-A use SimSpotLight = Cockpit spotlight, comes on with battery power, recommend bind to keyboard Things I've never used: SimDMSUp = Change SOI to HUD For users with no head tracking I highly recommend never using the hat switch for viewing and learning to use the mouse effectively instead, as it frees up the hat switch for vital functions. By default, one can look around by holding down the right mouse button, and can drag the head around using the middle mouse button. The pinky shift mechanic in BMS allows the pinky button on the F-16 HOTAS to function similar to the shift button on your keyboard, or the function button on some laptops. Just as the keyboard shift button allows other buttons to have multiple uses, the pinky shift mechanic allows you to effectively have two callbacks assigned to one joystick button and allows you to access the second callback by holding down SimHotasPinkyShift and pressing the desired button. SimHotasPinkyShift must be assigned twice to the desired shift button, as the act of pressing the shift button will shift the shift button too, and the game will not recognize the release of the button unless the callback is present in both the normal and shifted states. The only issue is that this mechanic is not accessible through the in-game setup screen (the in-game editor has other issues as well, one being that it does not actually show the correct callback names). To make use of it, one has to resort to using spreadsheets included with the game, third party editors (linked below), or modifying the keyfile by hand. The best way of binding your controls is currently the Alternative Launcher, which takes the place of the stock BMS launcher and has more functionality. https://github.com/chihirobelmo/FalconBMS-Alternative-Launcher/releases Other References: https://codex.uoaf.net/index.php/Controllers Quick HOTAS Setup.key See Also:
- 3 comments
-
- 6
-
-
- falcon bms
- noobs
- (and 1 more)
-
 untilVETERANS-GAMING FALCON 4.0 BMS EVENT TIME: 26th March 2022, 20:00:00 ZULU. Event details to be updated. Please register your interest by clicking on the RSVP button. Mission Objective Locate and destroy the Kuznetsov Carrier Task Force. Intel reports suggest that the Carrier is somewhere off the coast of North Korea, escorting 2-3 Oil tankers to the Port of Wonsan. Seoul Air base has been attacked by North Korean and Russian bombers, multiple North Korean Tank battalions have been spotted massing for an attack close to the South Korean border. The USS Carl Vinson Carrier Fleet and the USS Wasp are off the coast of the South Korean Air base near Kangnung. Your mission is to fly a coordinated multi-role operation to complete the following objectives: Suppress and destroy the SA-2 AA Battalions protecting Wonsan Port Locate and destroy the Kuznetsov Carrier fleet before it docks at Wonsan Port, destroy the 3 oil tankers if possible. Locate and destroy North Korean Tank Battalions approaching the South Korean Border. Squadrons: SEAD - Suppression of Enemy Air Defence Objective: Destroy enemy SA-2 Radar controlled vehicles, Fan Songs and Spoon Rests Air Base: Seosan - Squadron: 2109th 4 x F-16CM 52 - T/O: 07:20. TOT 07:53, PKG 2108 - Mudhen 6 Air Base: Kunsan - Squadron: 2160th 3 x F-16CM 40 - T/O: 07:20. TOT 07:44, PKG 2161 - Beast 7 (Escort) DEAD - Destruction of Enemy Air Defence Objective: Destroy enemy SA-2 missiles, and support vehicles Air Base: Seosan - Squadron: 2111st 4 x F-16CM 52 - T/O: 07:29. TOT 08:03, PKG 2108 - Hawkeye 5 Air Base: Kunsan - Squadron: 2160th 3 x F-16CM 40 - T/O: 07:25. TOT 07:55, PKG 2163 - Gamble 2 (Escort) TASMO - Tactical Air Support Maritime Operations Objective: Locate and destroy the Kuznetsov Carrier Task Force before it reaches Wonsan Port. Carrier: USS Carl Vinson CVN-70 CSG - Squadron: 2083rd 4 x F/A-18C Hornet RAAF - T/O 07:20, TOT 07:33, PKG 1980 - Diamond 4 Carrier: USS Wasp LDH-1 ARG - Squadron: 2082nd 4 x AV-8B+ Harrier RAF - T/O: 07:20. TOT 07:32, PKG 2090 - Jump 7 Air Base: Sokcho - Squadron: 2099th 4 x F-16D-52+ RSAF - T/O 07:20, TOT 07:35, PKG 2092 - Jackal 3 Air Base: Kangnung - Squadron: 2097th 4 x F-16D-52+ RSAF - T/O 07:20, TOT 07:35, PKG 2092 - Falcon 4 Air Base: Kangnung - Squadron: 2127th 4 x AV-8B+ Harrier RAF - T/O 07:29, TOT 07:47, PKG 2126 - Jump 6 PRE-PLAN CAS - Locate and Destroy North Korean Tank Battalions Objective: Destroy Enemy Tank Battalions heading towards the South Korean Border. Air Base: Sokcho - Squadron: 2104th 4 x F-16CM 52 - T/O 08:30, TOT 08:38, PKG 2103, Viper 4 Air Base: Kangnung - Squadron: 2106th 4 x F-16CM 52 - T/O 08:30, TOT 08:47, PKG 2103, Jaguar 3 AEW/ABCC - Command Control Communications Intelligence Objective: Provide Intelligence Reports over the combat zone. Air Base: Osan - Squadron: 2086th 1 x E-3 Sentry AWAC - T/O 06:56, TOT 07:32, PKG 2101, Chalice 1 (AI Controlled) Briefing We'll most likely use our Team Speak Channels for pre-flight & post-flight so we can coordinate who will be doing what. Feel free to stream this event on Twitch or other platforms. There are currently a total of 43 Jets available in this Operation but we can add more flights if necessary.
 -
Profile for VoiceAttack by =VG= SemlerPDX I will be running a Public Beta Test for AVCS CORE and AVCS4 Falcon BMS Radios (1.3.90b), and users are encouraged to try out both, or just AVCS CORE and its included Template Profile, if desired. Please use the voice command "Open Help and Support Menu" to communicate any bug reports. These help menus can be expanded without new profile versions, so suggestions are welcome. Thank you for checking out AVCS CORE for VoiceAttack! -Sem (Aug2020) v1.3.90b Full Overhaul & AVCS CORE Integration Update (beta) I'm very proud to finally offer the next version of AVCS4 BMS because it includes an entire set of profile control and support from my new AVCS CORE Framework Profile for VoiceAttack. While AVCS4 BMS has not functionally changed much from what users have come to expect, AVCS CORE adds entirely new features that remove any previous need to manually edit any commands in the traditional sense to modify any configuration settings or otherwise. The only significant new command added directly to AVCS4 BMS is "Edit the Callsigns List" (and phrase variations of it). This opens a simple Get Choice menu to offer options to add/change/edit/remove any callsigns recognized by the profile. After that, most everything comes from the required AVCS CORE Profile Framework that will load before AVCS4 BMS, adding commands and features, as well as allowing auto-profile switching by setting AVCS4 BMS as a "Preferred Profile" in the CORE Options Menu (say, "Open Core Options", poke around, have fun!) Features: see full details in post ↓ Please be sure to download the AVCS CORE 0.90b Profile from this download section as well, it is now a requirement for any AVCS4 game profile I release, such as the upcoming Elite Dangerous profile, and more... BETA Release AVCS4 BMS v1.3.92 Changelog Dec-6-2020 This is a Major Profile Update, and requires downloading and importing the latest AVCS4 BMS Radios (v1.3.92b) and AVCS CORE (v0.92b) profiles: Fixes/Improvements: -Improved AVCS_CORE and AVCS4 BMS profile initialization optimized again for decreased load time - most noticeable on first use -(AVCS4 BMS profile initialization should be even much faster now!) -Fixed infinite loop on Minor Version Rollback toggle and version display errors following toggle -Fixed International Decimals - All Decimal Variables now compatible for international users via cultural invariant token "DECINV" -Fixed All Wildcard Commands fixed to allow both Wildcard and non-Wildcard recognition ("anything that ends with" or "just the raw command") -Fixed Audio Feedback Mode not playing sound when commands recognized -Fixed Audio Feedback Mode on/off text entry in VA Event Log 'not set' BETA Release v1.3.90 Changelog Aug2020 New Commands: -AVCS CORE Commands Included into AVCS4 BMS Profile to lessen profile switching to CORE when it was needed -"Create a new Voice Authorization Phrase" and other included commands from Voice Authorization System -VAS can allow QCC commands to be locked behind a required authorization phrase as set by users, in up to 10 weighted levels -Integerated Bug Reporting and debugging options from AVCS CORE for easy troubleshooting -Versioning allows for Mutiple prior versions (reinitialization required) for easy profile version rollback if desired -Included UPDATE command to allow users to import previous saved user settings and saved Quick Commands from previous version of profile -Full profile control through command, "Open CORE Options Menu" -Better user support through command, "Open Help and Support Menu" (will expand in time) -User settings save file control through command, "Open Save File Menu" (includes save file backup and restore system) -...and much more (see posts at avcs homepage) Fixes/Improvements: -Set First Use to present user with Get Choice box for Default Keyboard Layout (QWERTY/AZERTY/etc..) -Setting 'CurrentBackupIndex' and 'SaveFileBackupCount' to 'Not Set' inside F_SFS_LOAD_ALL (was getting corrupted in save file) -Separated 'new_profiles.txt' file from AVCS4 profiles and AVCS CORE profiles to handle two imports before first time run/initialization of either -Added Duplicate Profile check from AVCS CORE, informs user of non-functional AVCS profiles (if ending in 'dash number' such as '-1') -Edited Preferred Profile command to allow for any user profile to be set to be auto-switched to after AVCS CORE finishes initializing ___ BETA Release v1.3.80 Changelog Mar2020 New Commands: -"Add/Edit Callsigns List" commands to add or remove callsigns recognized -"Add a new Voice Command" and others included from Quick Command Creator system - QCC can be used to create additional phrasings, just set action to execute another command (by name) -"Edit Keypress Timings" to open options menu to set custom timings Fixes/Improvements: -AVCS CORE Profile and Updates Management integeration (see AVCS CORE changelog) -Full Profile Update Control added with user choice, only downloads if allowed by user (only checks 8 bytes of a version number before that) -Profile Updates set to allow choice for majority of fixes/changes to occur without new VoiceAttack Profile download/import *called "LIVE UPDATES" -Physical Profile Updates set to allow previous versions to remain installed without conflict, and also import/uninstall previous version files *called "MAJOR UPDATES" -Fixed typo in command "Raygun" -- corrected from "Ragun" (first fix via new live updates system) -Created 'Add New Callsigns' system using Get-Choice boxes -Set most profile variables to config files in VA Apps Folder (edit with "Open Advanced Core Options" command) -Set most commands to Text Variables, read from config files
-
We'll be talking about the keyfile editor from the last post and will be using it to create a new keyfile. https://www.bmsforum.org/forum/showthread.php?10821-Keyfile-editor-Alpha-Release! A version with modified Quickstart keyfile and Callback Reference can be found here: https://www.dropbox.com/s/dln076plj6hs3xw/Keyfile editor Alpha 1.zip?dl=0 When you start it up, you will be greeted by two panes (and errors, ignore them). The lower pane has tabs, one tab for each device. In each tab there is a list of buttons that can be lit up by pressing them on your devices. We'll load the BMS Basic keyfile, you can do this with the full keyfile or the minimal keyfile, or you can use the quickstart keyfile bundled with the program. We are going to assign every button to a blank callback first, and then change the callback afterwards. Start by pressing the green '+' at the top right, doing so will add a blank unbound callback to the upper pane. We need one blank callback for every unbound joystick button, in this case eight of them. After we've made our blank callbacks we'll assign our unbound buttons to them, one button per callback. Double-clicking "Unassigned" in the right hand column will bring up a dialogue box, we can either press a joystick button or select a button from the drop down menu to assign it to the callback. We are going to change these blank callbacks later. It's easier to bind to blank callbacks and then change them than it is to assign buttons to the desired callbacks directly, as the program does not handle button conflicts very well. Next, we're going to be assigning the button that will function as our pinky shift. For those that have them, use the pinky button on your stick. For everybody else, find a button that's easy to hold down while pressing other buttons simultaneously. I'll use Joy 1 Button 10, remember what you choose as it will be important later on. In the bottom pane, double-click on the current callback for that button to bring up a library of callbacks, sorted by their location in the cockpit of the F-16. We want to look for the Flight Stick section under Flight Control (HOTAS), and select SimHotasPinkyShift, and hit OK. Once the pinky shift button is assigned, we need to save the keyfile and close the program immediately. Reopen the program and reload the saved keyfile and you will be greeted with new tabs for your shifted device states. Go to the new tab for your shifted device and do the same thing we did at the start, pressing '+' to add a new blank callback for every unbound button in your shifted device tab. To assign our shifted buttons, we need to do something slightly different. Click "Unassigned" like we did the first time around, but this time when the dialogue box pops up we will need to hold our pinky shift button in combination with the desired button to map. The end result should include the string <Shifted>. As before we'll assign every unbound button, but this time these buttons all require you to press them while holding the pinky shift button. This poses an issue for our pinky shift button, as we can't "shift" the "shift button" here. Instead, we'll have to select the shifted counterpart (in our case Joy 1 <Shifted> Button 10) of our pinky shift button from the dropdown menu. If you can't find it you can press another shifted combination to put the dropdown menu in the right area, then select the correct button. "But if we can't shift the shift button then why do we need to bother assigning it in it's shifted state?" Just do it, I'll explain shortly. After assigning the remainder of your buttons, we'll return to the "shifted" shift button. As I said before, we can't "shift" the "shift button" in this program. But BMS does. Technical stuff, don't worry too much about it: Put simply, BMS by default automatically reserves lots of buttons. 256 of them, 0 to 255, 32 for each device. The pinky shift mechanism in BMS works by effectively increasing each joystick button number by 256. When we bind callbacks to the shifted layer we are binding callbacks to buttons 256-511 instead of the normal 0-255. The issue is that when we tell the game to shift buttons upwards, the pinky shift button is shifted upwards as well and the game cannot tell when it is released because the associated button number doesn't exist anymore. The way around this is to assign SimHotasPinkyShift twice, once to the desired button (Joy 1 Button 10 as done previously), and again to it's shifted counterpart (Joy 1 <Shifted> Button 10). Double-click on the callback, scroll up to the Flight Stick section under Flight Control (HOTAS), and select SimHotasPinkyShift again, and hit OK. Once we've taken care of the pinky shift bindings, we can assign the rest of our buttons as desired. Below you can see the end result. Note SimHotasPinkyShift, as discussed before, is assigned to the same button in both the normal and shifted states. Recreated above is the setup I use for my Hotas X. You may find it worth it to sacrifice certain things like TMS Right, DMS Up/Left/Right and maybe even TriggerFirstDetent for things like wheel brakes, airbrakes toggle or landing lights based on your needs. I use racing wheel pedals for differential toe brakes and the rocker on the back of the Hotas X mapped to keyboard buttons (using JoyToKey) for extending and retracting airbrakes, which is why neither of these are present here.
-
Now that we've got the VG Air Force group officially created as a part of this website, I thought it would be good to discuss the plans and ideas for the future of the VG Air Force. First of all, I would like VG Air Force to be a home for pilots on the VG BMS Server, and should be the home for more than one VGAF Virtual Fighter Squadron, that way a VG Air Force pilot might enjoy being part of some VGAF Harriers Squadron with some unique name and number, and also take part in the events of the VGAF F-16's Strike Squadron, or something. Would like to let this thing grow into the different aspects of BMS that we enjoy, and organically let our members take up leadership roles if desired for training others, or hosting VGAF events of any kind. We should try to mix up the scheduling as well, so as to not stack too many during other events (some of us play other games here at VG, as well), so care should be taken when deciding on times for regular repeating events. It would be wise to begin creating some forum post materials that can serve as easy reference for standards we may like to encourage, from manner of dealing with in-game comms to use of in-game radio commands and communicating with ATC/AWACS/ETC. -- we can also try to discuss common multiplayer concepts and standards that we all might want to get on the same page with. Obviously, pilots learn these things as we all fly together, but having a central location to point people to will help create actual reference guides in the future. Thought it might be fun for us to all start at the 2nd Lt. and move through the ranks of this group based on some agreed upon criteria, including time with the VGAF, time on the server, and proficiency in a number of tasks from mundane to challenging, as appropriate. Needs discussion, and ideas. So, let's have at it in this thread, and flesh out this new VG Air Force into something we all enjoy!
- 10 replies
-
- 5
-
-
-
- vg air force
- vgaf
- (and 4 more)
-
This is another absolute gem of a video by the great B3rno at B3 Productions on YouTube -- smack the fullscreen button, crank the volume, and feel the G's!!
-
- 8
-
-
- falcon bms
- benchmark sims
- (and 7 more)
-
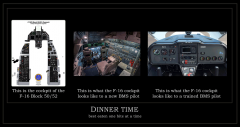 I tossed together this highly technical info-graphic to highlight the knowledge barrier that all sim pilots must bypass in order to proceed with flight training
-
- 3
-
-
-
- benchmark sims
- bms
- (and 2 more)
-
Updated for 4.34 Text about purpose of blog post One aspect of getting involved in Falcon that can't be learned or prepared for in single player is the configuration and use of voice comms. Here I attempt to describe basic and advanced configuration and use of IVC. Setting up the IVC Client Basic Setup Input and Output In the "Sound Devices" section at bottom of IVC Client program, select your microphone in "Capture" list and speakers/headphones in "Playback" list. This is usually the only required setup step, and if you have the correct things set as the default devices to use then even this should take care of itself. Advanced Setup, in \Bin\x64\IVC\IVC Client.ini Inserted at the bottom of this section is my own configuration file Sidetone and sidetone accesories We can add a Sidetone that will let us hear our own voice when we transmit. We use the "tone = " option in the .ini, and set it to "loop:#", where # is a number. To find this number, right-click on the volume icon and select playback devices. Click on your playback device of choice (here it is "Speakers"), and in the "levels" tab find your microphone. Each entry has a number starting from 0 at the top, and in this instance our microphone would be 1. Following the above, we would set our loopback in the .ini file using "tone = loop:1". We can also use "toneVol" option to raise or lower the sidetone volume. Usable values as defined in the manual are +6 to -6. I use "toneVol = +6". Loudness Setting "loudness = 1" adds compression to incoming audio, making it easier to hear other players. Outsiders Using "outsiders = all" is the best option for listening to players who are in 2D while we are flying. Other options are detailed in BMS-Manual.pdf on pages 257-258. Using IVC in the map screen Connecting When connecting to the server, enter the IP address of the IVC server as well. Once clicking connect, the game should take control of the IVC Client window and connect to the IVC server automatically. For most users it's not necessary to touch the IVC Client window beyond the initial setup steps. F1 and F2 Once in-game and connected to the server in 2D, the F1 and F2 keys let us communicate by voice to others who are either in 2D with us, or in the cockpit and have their UHF radios tuned to preset 14. F1 will communicate with anybody in-flight who is on the UHF 14 preset, F2 is for people hanging out at the map screen only. Make sure you use the right one, if you have a conversation in 2D using F1 then people in-flight will be able to hear you. Using IVC in flight Coordinating with other players None of this is useful unless everybody knows how stay in contact with everybody else. Members of each flight need to know what VHF channel to use to talk to one another, and multiple flights should know which UHF channel to use to coordinate with one another. Using preset channels We normally use preset channels for radio comms. By default the F16 has a frequency assigned to each preset, we don't normally change any presets after the 4.34 update. To change preset using the ICP, press COM1 for UHF or COM2 for VHF and type in a preset, 1 to 20, and press ENTR. For most uses UHF is set to 6 normally, or 14 to talk to people in 2D. Using frequencies We use sometimes use frequencies when having radio problems, sometimes there are issues with somebody's presets and they have a preset assigned to a different frequency. To change frequency, press COM1 for UHF or COM2 for VHF and type in a frequency, without the decimal point. For example, to dial in the Kunsan tower frequency (292.3) we would type in 2923 and press ENTR. Talking Once we're in the cockpit, we use the Comm switch to broadcast on UHF or VHF. When we do, either UHF or VHF will be highlighted in the DED depending on which one we're using. See the first "Keybindings for new players" post for more details on the Comm switch. Comms volume Comm1 volume is for UHF, used mainly for inter-flight comms and for AWACS. Comm2 is VHF and is used for communicating with your flight. The tiny volume knob on the backup UHF panel balances the volume between AI radio comms and player voice comms. Guard frequency UHF guard frequency is 243.0 MHz, all UHF receivers also listen to guard frequency by default, making it useful if we need to transmit to as many people as possible. VHF has a guard frequency as well but people must choose to listen to it. We can transmit on Guard by switching either COMM mode knob to "GD". Backup Radio 87th Tripp made a good video on the backup radio.
-
 PBAsydney, Jeffu, Kura and I went on a 4-ship anti-air sweep above the war in South Korea today. Here's the excellent debrief - well done guys!
 -
The goal of BVR is to kill the other guy without him killing us back. That's pretty much it. We'll start with the weapons. There are missiles like the AIM-7 that require constant radar guidance in order to hit their targets, and there are missiles like the AIM-120 that don't. The former is mostly useless and easily defeated. We only care about the latter type here. The 120 is initially guided through datalink from the firing aircraft, until it reaches the point where the missiles own radar can take over and guide it to the target aircraft. This doesn't always have to be the case though. If the firing aircraft cannot maintain missile guidance, the missile will attempt to guide itself using the target aircraft's last known position and heading. This makes the AIM-120 sort of like an air to air cruise missile. The upside and downside is that there is no launch warning. Newer enemy aircraft will have similar weapons available. You may get a hint or two if they decide to crank left or right after firing, but you must always assume that if you're within firing range then so are they. The only other way to know for sure is if the missile is already tracking you. When we engage in BVR we need to take into account several things: How close is the target? Is it a MIG-29 or a Su-27/30/33/37? If the target doesn't go defensive before your missile begins tracking on its own, it will afterwards. How much energy will the missile have left when it reaches the target? When do we go defensive? Are there any friendly aircraft in the target area? Are we sure the target is an enemy aircraft? 1. If a peer adversary (one with similar capabilities to us) gets too close, we have to assume that it has already fired at us and take immediate defensive action. If it's further away we can assess the threat and engage it. 2. The RWR in the F-16 variants flown in the standard Korean theatre show both the MIG-29 and all Flanker variants with the 29 symbol. This is vital to keep in mind as the MIG-29, while still a major threat, is fairly simple to shoot down (Correction: later versions of the MIG-29 have access to the AA-12/R-77, which has a longer range than the AIM-120 as modeled in BMS and similar capability), whereas the Flanker has capabilities which rival our own and needs to be taken much more seriously. 3 and 4. The best way to defend yourself is to not be shot at in the first place. Other than that, the best way to defend yourself is to go defensive as soon as possible. We need to guide a missile and so does our target. The longer we guide it the better the shot quality will be and the more we put ourselves at risk, and this applies for the enemy as well. You might guide the missile for 5 or 10 seconds and hope it hits as you burn away, or you might choose to take your chances and wait as long as possible until you hear the RWR audio tone of an incoming missile. This also applies to the enemy. If we launch from too far away our missile will not have enough energy to catch the target when it decides to turn and run. 5. If we leave our outgoing missile to its own devices, it will attempt to find its way to the target and hit anything it sees. You may be tempted to help out someone who got a little too close to the enemy, but if your missile tracks him instead he's toast anyway. Again, this also applies to AI aircraft, so spacing and situational awareness can be very important as you don't want to take a missile that was meant for somebody else. 6. No clue, go and find out. We either have to rely on an AWACS declaration or use our targeting pod in air to air mode to gain a visual confirmation of our target. A third option is our FCR, which may be able to display aircraft type at the top of the MFD in certain situations, but don't count on it. --- The engagement process will be explained through video (below) of an actual engagement that occurred shortly after takeoff and caught us off guard: At 25 seconds, a threat appears just as we make our fence in call, which delays our response. At this point, all we have is a 29 partially obscured by a friendly on our RWR. I could have used the TGT SEP button to separate them, but I didn't consider it necessary. 40 seconds: After the fence in call is taken care of, we need to find the threat aircraft. The RWR is fairly accurate at longer ranges, so all I have to do is search in the general heading. Once we find a contact in the right direction, we ask for an AWACS declaration, which my wingman receives first because I have text turned off and have to wait for the audio. At around 55 seconds I call for my wingman to go spread, and then give him permission to take a shot if he has one. At 1:13 you can see me switch to Track While Scan on the left MFD, which will let me fire on multiple targets if necessary. 1min 20: I pull up according to the steering cue and send a missile downrange. My normal criteria for a launch is below the circle on the range scale, but as a bit of a bonus the bar jumps upwards to account for our slight loft. After launch I immediately pull off to the right while maintaining lock on the enemy aircraft in order to reduce the closure rate to the enemy (and therefore the chance of being hit) as well as drag any potential incoming missile outwards into a lead pursuit and waste some of its energy. 1min 45: I make the decision to abandon my missile and go defensive with 6 seconds to go (M06, below the range scale), assuming (correctly) that I've been launched on and (incorrectly) that a missile would be stopping by to deliver mail shortly. It turns out I could have waited another ten seconds or so, but I didn't take any chances. When going defensive I dive down and away to force the missile into thicker atmosphere to waste its energy while maintaining moderate G (under 5) and speed (under 550kts) to avoid damaging stores or the aircraft and forcing an aborted mission. This defensive maneuver is also shown in a second video I'll put below as well. This move is not safe below 16,000 ft. over enemy territory, as MANPADS will take you down. This limits the effectiveness of the tactic and means we have to be even more cautious over enemy territory. At 2:35, the missile has been defeated and the enemy aircraft has been shot down by #2, though we don't know it right away. I turn back in prepared to re-engage and look around, while #2 eventually calls AWACS who confirms no more threat. Other times the only way you know for certain is when you look all over and can't find it anymore. Below is a more extreme version of the defensive maneuver, which includes an emergency jettison: Hopefully this will be of use, and will prevent people from dying while playing with military combat aircraft on the internet. Other BVR tactics are available, some of which require extreme bravery and testicle radius.
-
- 5
-
-
- falcon bms
- things that sound like an std
- (and 1 more)
-
Falcon BMS IVC Multiplayer Comms Setup SOP *Talk on VHF unless you have a radio failure! Always open IVC Client first -- Check Sound Device Assignments BEFORE EVERY FLIGHT: 1. Open Data Cartridge 2. Click COMMS tab at top 3. Change Preset to # 15 4. Click SET TOWER 5. Click SAVE During RAMP Start, ensure AUX COMM Control is set to UFC Set both Radio Mode knobs as shown; ensure COMM1 and COMM2 volumes are set above OFF: Use the ICP to move the Scratchpad Indicator to the VHF and UHF Fields Use the Control Rocker to change channels. We always set UHF to 15 prior to Takeoff -- We set VHF to 1* *(if other groups are online, we set VHF to Package Channel during RAMP) After takeoff and departure, we set both VHF and UHF to our Package Channel This number depends on how many other groups are flying on the server First Group would be 6, next 7, and so on -- See chart below explaining Preset Comms Channel usages Your Push to Talk buttons for VHF and UHF will depend on your control setup. These controls are part of a HAT Switch on the Throttle lever. Only one person can transmit at a time, and others will not be able to interrupt. Brevity is highly encouraged! Reference: Default Radio Frequency Presets Agency UHF Preset VHF Flight 1 297.50 1 138.05 Flight 2 381.30 2 138.10 Flight 3 275.80 3 138.20 Flight 4 294.70 4 126.20 Flight 5 279.60 5 134.25 Package 1 349.00 6 133.15 Package 2 377.10 7 132.35 Package 3 292.20 8 126.15 Package 4 264.60 9 132.875 Package 5 286.40 10 132.325 From Package 354.40 11 132.575 Proximity 269.10 12 121.20 Team** 307.30 13 119.50 Broadcast/Guard 377.20 14 120.10 Open 354.00 15 134.10 Open 318.10 16 126.80 Open 359.30 17 120.00 Open 324.50 18 141.80 Open 339.10 19 123.70 Open 280.50 20 121.70 Radios COM1 and COM2 (UHF and VHF) both have 20 presets available to them and each preset can be assigned a valid frequency within its respective band range. There are separate up-front and backup control sets for the UHF radio (ICP/DED-based and UHF control head respectively) and the backup radio has only 19 presets available. UHF The UHF band frequencies are from 225.000-399.975 MHz in 25 kHz stepping. Since 25 kHz stepping applies, the 5th digit of a 6-digit freq must end with 0, 2, 5, or 7 and the 6th digit must end in 5 or 0. Examples of valid freqs: 371.075, 377.10, 271.6. Examples of invalid freqs: 339.11, 271.14. It should be noted that the pilot may only input freqs using 5 digits and he will only see 5 digits in the Upfront Controls (UFC, i.e., the DED), but it is possible to assign preset freqs with 6 digits. Although this capability will rarely be used, it is possible by using the DTC and will always be required if entering frequencies direct into the IVC client applet. VHF The VHF band frequencies are from (AM mode) 116.000-151.975 MHz in 25 kHz stepping. The FM mode (30.000-87.975 MHz) is not implemented. The rules regarding digit input are the same as those which apply to the UHF band. **Setting the UI Radio Frequencies (For reference only! This is not an SOP at the VG BMS Server!) To change the team frequency (preset 13) to a non-default channel, open up the C:\Program Files\Falcon BMS 4.33 U1\User\Config\falconbms.cfg file with a plain text editor like Notepad. Advanced Users participating in PvP Force on Force Servers can edit these lines: /////////////////// // Misc Settings // /////////////////// set g_bVoiceCom 1 // Enable Voice Communications set g_nF1TeamUiFreq xxxxxx // Frequency for F1 UI voice comms (for Force on Force type missions). set g_nF2TeamUiFreq xxxxxx // Frequency for F2 UI voice comms (for Force on Force type missions). (replacing xxxxxx with your team and squadrons pre-briefed frequencies.)

- 7 replies
-
- 4
-
-
- bms
- multiplayer
- (and 6 more)
-
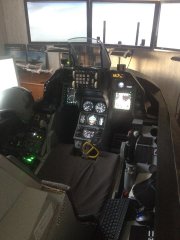 Fred Maillochaud shared this picture of his amazing home cockpit setup for Falcon BMS. This thing is absolutely beautiful! Those who fall in love with the best F-16 sim in the world know that you could fly Falcon BMS with a mouse and keyboard, but there is nothing cooler than never having to touch either one during a flight!
 -
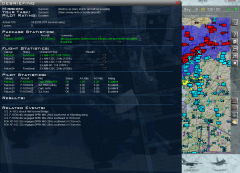
 Took a picture of the debrief and Data Card from a flight I led on the Falcon BMS Server. We absolutely destroyed the 1st and 2nd Tank Battalions and the 1st Mech Battalion - they each literally had only one vehicle standing after we swept through. Mk-20D Rockeye cluster bombs for the win! Love this simulator!
 -
 It always seems so peaceful on ingress... Minrah, Falco, Jeffu and I flew a handful of missions on the VG BMS Server today in the 24/7 Korean War going on there - in one of our missions, we shot down 13 MiG's between the four of us, and throughout the day most of us returned to base and landed safely (most of the time). No shortcuts, it's the real deal trying to fly one of these jets, but it's worth the time it takes to learn!
- 6 comments
-
- 5
-
-
- bms online
- bms multiplayer
- (and 2 more)
-
DEDICATED SERVER CONNECTION DETAILS CLICK HERE: *UPDATE MARCH 25TH 2018: NEW MINIMUM CLIENT BANDWIDTH OF 1500 IS NOW REQUIRED! UPDATE SEPTEMBER 22th 2017: NEW SERVER IS NOW LIVE! IP ADDRESS HAS CHANGED! 64-bit Version NOW REQUIRED! Details Link: New VG BMS Server Official VETERANS-GAMING Falcon BMS 4 Server! Please use the details below to connect. VG will always be running the latest BMS version. PLEASE DO NOT ADD OR DELETE AI FLIGHTS!! 64-bit Version of BMS Required! Select prior to launch! IP: 205.161.30.10 Recommended BW: 1500 IVC ON 120th FS at Seosan is set for no AI gerneration (fly here, or fly at busy airbases at your discretion, see list below) PLEASE JOIN OUR TS3 SERVER IF YOU'RE NOT ON IVC! - If you are going to be AFK for longer than 5-10 minutes please leave the server. - No team killing or asset abuse; protect the airframe as best you can. - No Hate! - DO NOT make any changes to the Server Priorities List! DO NOT change the Target Types, Mission Types, or PAKS! - DO NOT Add or remove AI Flights, or mess with the clock! The only acceptable way to manage the clock is thru the ATO ONLY! If you don't know how, please don't mess with it! If you're looking for a good group of people to fly with, drop by and check us out. s/f


-
Who's Online