All Activity
- Last week
-
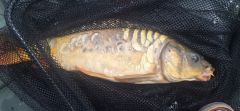 Nice good catch
 -
That's a big carp if i ever saw one. Good catch!
-
Nice
-
 Scarecrow420 changed their profile photo
 -
Scarecrow420 joined the community
-
 Thomascgb joined the community
 -
-
-
 MaxineVisse joined the community
 -
 jack1234 joined the community
 -
 kinoOo joined the community
 -
 uchihaobito3 joined the community
 - Earlier
-
I wish the best for =VG= but unlock COCO BONGO SQ leader no? It's just a game i'm not a gangsta.... I respect my squad all times come on...
See u all team on =VG= baguette smack héhé.
-
 SOROKIN changed their profile photo
 -
[Project Reality Event] Back To Roots - BF2 Maps - TBD
=VG= Sphee replied to =VG= Sphee's topic in PR Cooperative
Event postponed. Apologies for the inconvenience. -
hi i am for india and really excited about this community as i have been following it thorough arma 3 and have been a great fan of its efforts. more recently i got to know about falcon bms and really loved it. i am still a beginner but would love to learn from any one...thanks for reading this through outtt and willl see u in the sky
-
Hello, A quick update from me on the maplist that i've not updating since this post (which is now locked, it's been awhile). I've decided to make another one. This kinda came from @System request, thanks for reminding me that one on Discord. Hopefully can be your reference onwards future. Enjoy reading! ***NOTE: UPDATED FOR v1.9.0.1*** Basic Infantry Maps: As the title said, infantry layouts of some maps that aren't priority to vote or play, unless someone wants to do it. This is an alternative of the low pop maps, in case of lesser player count/wants niche choices other than low pop map options. (Works for >15 players) 1km: - Asad Khal INF (GER vs. MEC) - Fallujah West INF (USMC vs. INS) - Gaza INF (IDF vs. Hamas) - Grostok INF (CHE90 vs. RU90) - Tad Sae Offensive INF (USMC vs. PLA) 2km: - Al Basrah INF (GB vs. INS) - Assault on Grozny INF (CHE90 vs. RU90) - Beirut INF (IDF vs. RU) - Donbass INF (PL vs. RU) - Dragon Fly INF (CAN vs. MIL) - Fool's Road INF (GB vs. MIL) - Iron Ridge INF (RU vs. MIL) - Krivaja Valley INF (FR vs. RU) - Lashkar Valley INF (GER vs. Taliban) - Muttrah City INF (GB vs. INS) - Nuijamaa INF (RU vs. PL) - Operation Barracuda INF (USMC vs. PLA) - Operation Brunswick INF (WW2RU41 vs. WW2GER41) - Operation Marlin INF (FR vs. MEC) - Ramiel INF (USA vs. ARF) - Route E-106 INF (GER vs. RU) - Sahel INF (PLA vs. ARF) - Sbeneh Outskirts INF (MEC vs. FSA) - Shahadah INF (PL vs. MEC) - Stalingrad Winter INF (WW2RU41 vs. WW2GER41) - Stalingrad Summer INF (WW2RU41 vs. WW2GER41) - Talbisah INF (SAF vs. FSA) - Zakho INF (CAN vs. FSA) 4km: - Adak INF (RU vs. USMC) - Ascheberg INF (FR vs. RU) - Bamyan INF (USA vs. Taliban) - Burning Sands INF (GB vs. MEC) - Fields of Kassel INF (WW2USA vs. WW2GER) - Hades Peak INF (GB vs. RU) - Icebreaker INF (RU vs. USMC) - Kashan Desert INF (CAN vs. MEC) - Korbach Offensive INF (GER vs. RU) - Masirah INF (FR vs. MEC) - Operation Bobcat INF (USMC vs. PLANMC) - Operation Thunder INF (NL vs. MIL) - Pavlovsk Bay INF (USMC vs. RU) - Road to Damascus INF (RU vs. FSA) - Shijia Valley INF (GB vs. PLA) - Silent Eagle INF (GER vs. RU) - Vung Ro INF (VNUSMC vs. NVA) 8km: - The Falklands INF (GB82 vs. ARG82) _______________________________ Low Population Maps: R.I.P for these maps! - Operation Archer - Jabal Al-Burj - Qwai River - Bijar Canyons - Operation Ghost Train Since the day of removal, i've made a map list that we can play for low pop (for experimental purposes). Hopefully these can be standard replacement for seeding. Some of them can be played on full pops, but results into a steamroll round if done correctly. (Works for 10-20 players) 1km: - Asad Khal ALT (IDF vs. MEC) - Asad Khal STD (IDF vs. Hamas) - Asad Khal LRG (MEC vs. IDF) - Assault on Mestia STD (USMC vs. MIL) - Assault on Mestia LRG (USMC vs. MIL) - Fallujah West STD (USMC vs. INS) - Fallujah West LRG (MEC vs. USMC) - Gaza STD (IDF vs. Hamas) - Grostok ALT (CHE90 vs. RU90) - Grostok STD (RU90 vs. CHE90) - Korengal Valley STD (USA vs. Taliban) - Merville STD (WW2USA vs. WW2GER) - Reichswald STD (WW2USA vs. WW2GER) 2km: - Al Basrah ALT (GB vs. INS) - Al Basrah STD (GB vs. INS) - Al Basrah LRG (USMC vs. INS) - Assault on Grozny ALT (CHE90 vs. RU90) - Assault on Grozny STD (RU90 vs. CHE90) - Assault on Grozny LRG (RU vs. MIL) - Battle of Debrecen STD (WW2RU vs. WW2GER) - Beirut ALT (RU vs. IDF) - Beirut STD (MEC vs. RU) - Brecourt Assault STD (WW2USA vs. WW2GER) - Carentan ALT (WW2USA vs. WW2GER) - Carentan STD (WW2USA vs. WW2GER) - Donbass ALT (USA vs. RU) - Donbass STD (NL vs. RU) - Dovre Winter ALT (RU vs. GER) - Dragon Fly ALT (GER vs. MIL) - Dragon Fly STD (GB vs. MIL) - Fool's Road ALT (GB vs. MIL) - Goose Green ALT (ARG82 vs. GB82) - Goose Green STD (GB82 vs. ARG82) - Iron Ridge STD (PL vs. RU) - Iron Ridge LRG (GER vs. MIL) - Kafr Halab STD (SAF vs. IDF) - Karbala ALT (USA vs. INS) - Karbala STD (USA vs. INS) - Kokan ALT (CAN vs. Taliban) - Kokan STD (USA vs. Taliban) - Kokan LRG (GB vs. Taliban) - Kozelsk ALT (GB vs. MIL) - Kozelsk STD (RU vs. MIL) - Kozelsk LRG (CAN vs. RU) - Krivaja Valley ALT (RU vs. FR) - Krivaja Valley STD (FR vs. RU) - Lashkar Valley ALT (GER vs. Taliban) - Musa Qala ALT (USMC vs. Taliban) - Musa Qala STD (GB vs. Taliban) - Muttrah City STD (USMC vs. MEC) - Omaha Beach ALT (WW2GER vs. WW2USA) - Operation Barracuda ALT (VNUSMC vs. NVA) - Operation Barracuda STD (USMC vs. PLA) - Operation Brunswick ALT (WW2GER41 vs. WW2RU41) - Operation Brunswick STD (WW2RU41 vs. WW2GER41) - Operation Falcon ALT (NL vs. MIL) - Operation Falcon STD (NL vs. RU) - Operation Marlin STD (FR vs. MEC) - Outpost ALT (MEC vs. INS) - Outpost STD (PL vs. Taliban) - Ramiel ALT (USA vs. ARF) - Ramiel STD (USMC vs. ARF) - Ras El Masri ALT (MEC vs. RU) - Rzhev ALT (WW2GER41 vs. WW2RU41) - Rzhev STD (WW2RU vs. WW2GER) - Sahel STD (FR vs. ARF) - Sbeneh Outskirts STD (SAF vs. FSA) - Shahadah ALT (IDF vs. Hamas) - Shahadah STD (PL vs. MEC) - Stalingrad Winter ALT (WW2GER41 vs. WW2RU41) - Stalingrad Winter STD (WW2RU41 vs. WW2GER41) - Stalingrad Summer ALT (WW2RU41 vs. WW2GER41) - Stalingrad Summer STD (WW2RU41 vs. WW2GER41) - Talbisah ALT (SAF vs. FSA) - Ulyanovsk ALT (RU vs. GER) - Zakho ALT (GER vs. INS) - Zakho STD (NL vs. MEC) 4km: - Adak ALT (RU vs. USA) - Adak STD (USMC vs. PLANMC) - Bamyan ALT (USA vs. Taliban) - Bamyan STD (USA vs. Taliban) - Battle of Kerch ALT (WW2GER41 vs. WW2RU41) - Battle of Kerch STD (WW2RU41 vs. WW2GER41) - Black Gold ALT (PLA vs. MIL) - Black Gold STD (PLA vs. RU) - Burning Sands ALT (GB vs. INS) - Kashan Desert ALT (MEC vs. FSA) - Kashan Desert STD (CAN vs. MEC) - Kashan Desert LRG (USA vs. MEC) - Khamisiyah ALT (USMC vs. MEC) - Khamisiyah STD (USA vs. MEC) - Korbach Offensive STD (GER vs. RU) - Masirah ALT (CAN vs. PLA) - Masirah STD (GB vs. MEC) - Operation Bobcat STD (USMC vs. PLANMC) - Pavlovsk Bay STD (USMC vs. RU) - Shijia Valley ALT (GB vs. PLA) - Shijia Valley STD (GB vs. PLA) - Silent Eagle ALT (GER vs. RU) - Silent Eagle STD (GER vs. RU) - Vadso City ALT (GB vs. RU) - Vung Ro LRG (VNUSMC vs. NVA) - Wanda Shan ALT (FR vs. PLA) - Yamalia ALT (NL vs. RU) _______________________________ The Usual: Generally these should be your go to map choices when you're on the way to 40+ players, but do note that some of these are probably not good for low pops. You can "avoid" these if you're looking for more challenging maps. (Works for 20-30 players) 1km: - Hill 488 STD (VNUSMC vs. NVA) 2km: - Battle of Ia Drang STD (VNUSMC vs. NVA) - Beirut LRG (IDF vs. RU) - Carentan LRG (WW2GER vs. WW2USA) - Donbass LRG (PL vs. RU) - Dovre Summer STD (NL vs. RU) - Fool's Road STD (GB vs. MIL) - Fool's Road LRG (GB vs. MIL) - Kafr Halab LRG (SAF vs. IDF) - Lashkar Valley STD (GER vs. Taliban) - Muttrah City ALT (MEC vs. USMC) - Muttrah City STD (PLANMC vs MEC) - Nuijamaa ALT (PL vs. RU) - Omaha Beach STD (WW2USA vs. WW2GER) - Operation Brunswick LRG (WW2GER41 vs. WW2RU41) - Operation Falcon LRG (CAN vs. MIL) - Operation Marlin LRG (CAN vs. MEC) - Ramiel LRG (USA vs. ARF) - Route E-106 ALT (GB vs. RU) - Route E-106 STD (NL vs. RU) - Sbeneh Outskirts LRG (USA vs. RU) - Shahadah LRG (PL vs. MEC) - Talbisah STD (SAF vs. FSA) - Talbisah LRG (IDF vs. FSA) - Ulyanovsk STD (GER vs. RU) - Zakho LRG (FR vs. MEC) 4km: - Adak LRG (PLANMC vs. USMC) - Ascheberg STD (GER vs. RU) - Bamyan LRG (MEC vs. IDF) - Battle of Kerch LRG (WW2RU vs. WW2GER) - Black Gold LRG (SAF vs. MEC) - Burning Sands STD (GB vs. MEC) - Burning Sands LRG (MEC vs. PLA) - Fields of Kassel LRG (WW2GER vs. WW2USA) - Hades Peak ALT (GB vs. MIL) - Hades Peak STD (GB vs. RU) - Icebreaker STD (USMC vs. RU) - Khamisiyah LRG (RU vs. FSA) - Korbach Offensive LRG (USA vs. RU) - Kunar Province STD (USA vs. Taliban) - Masirah LRG (FR vs. MEC) - Operation Bobcat ALT (PLANMC vs. USMC) - Operation Bobcat LRG (USMC vs. PLANMC) - Operation Thunder ALT (RU vs. PL) - Operation Thunder STD (PL vs. MIL) - Operation Soul Rebel ALT (RU vs. USMC) - Pavlovsk Bay ALT (RU vs. USMC) - Pavlovsk Bay LRG (USMC vs. RU) - Road to Damascus ALT (SAF vs. FSA) - Road to Damascus STD (SAF vs. IDF) - Saaremaa ALT (USMC vs. MIL) - Saaremaa STD (USMC vs. RU) - Silent Eagle LRG (RU vs. GER) - Stalingrad Summer LRG (WW2GER41 vs. WW2RU41) - Vadso City STD (GB vs. RU) - Vadso City LRG (GB vs. RU) - Vung Ro STD (VNUSMC vs. NVA) - Wanda Shan STD (GER vs. PLA) - Wanda Shan LRG (PLA vs. FR) - Xiangshan STD (FR vs. PLA) - Yamalia STD (USA vs. RU) - Yamalia LRG (CAN vs. RU) _______________________________ Hard Maps: These maps are the hardest and challenging to play if not done correctly. You need a good understanding of this, if you're under new players perspective. A last resort choice, when you have more pops in the server. These includes specific-era maps (ex. Vietnam, WW2 etc.), OPFOR-oriented maps and time-based maps (dusk, night etc). (Works for <35 players) 1km: - Fallujah West ALT (INS vs. USMC) - Gaza ALT (Hamas vs. IDF) - Hill 488 ALT (NVA vs. VNUSMC) - Hill 488 LRG (VNUSMC vs. NVA) - Tad Sae Offensive ALT (VNUSMC vs. NVA) 2km: - Battle of Ia Drang ALT (VNUSMC vs. NVA) - Carentan INF (WW2USA vs. WW2GER) - Charlie's Point ALT (NVA vs. VNUSMC) - Charlie's Point STD (VNUSMC vs. NVA) - Dovre Winter STD (GER vs. RU) - Kafr Halab INF (FSA vs. RU) - Kafr Halab ALT (FSA vs. INS) - Kokan INF (Taliban vs. USA) - Kozelsk INF (MIL vs. FR) - Musa Qala INF (Taliban vs. GB) - Nuijamaa STD (FR vs. RU) - Omaha Beach INF (WW2USA vs. WW2GER) - Operation Barracuda LRG (USMC vs. PLA) - Operation Falcon INF (MIL vs. NL) - Operation Marlin ALT (FR vs. Hamas) - Outpost INF (Taliban vs. USA) - Outpost LRG (PL vs. MEC) - Ras El Masri INF (USMC vs. INS) - Ras El Masri LRG (FSA vs. MEC) - Sahel ALT (FSA vs. PLA) - Sbeneh Outskirts ALT (FSA vs. MEC) 4km: - Ascheberg ALT (NL vs. RU) - Black Gold INF (PLA vs. MIL) - Khamisiyah INF (FSA vs. USA) - Kunar Province ALT (Taliban vs. USA) - Operation Soul Rebel STD (GB vs. RU) - Vung Ro ALT (NVA vs. VNUSMC) - Xiangshan ALT (VNUSMC vs. NVA) - Yamalia INF (CAN vs. RU) I'll try to keep up with the updates here once there's new layout/PR updates on COOP content. Cheers - Inch
-
Welcome to the forums!
-
Welcome to the forums! Finally, you're here
-
Hey ThePrinceVince here! Have been playing with a few of you on PR COOP. I've played PR for as long as I can remember, had to use the ol' BF2 CD. Other games I like to play are Rocket League, EA Sports FC26, Minecraft, Super Animal Royale (Also known as Super Animal World). Can Also find me on the VG Discord server.
-
 ThePrinceVince44 changed their profile photo
 -
 McSqueezy changed their profile photo
 -
An ambush is a short and rapid attack on an enemy force that is moving or at a short stop. The goal of organizing it can be: capturing a prisoner, capturing documents, capturing new enemy weaponry or equipment, inflicting losses and creating a decline in enemy morale. Place of an ambush is chosen to provide the most cover and concealment possible and a concealed retreat route. The tactic I’ll describe below is more akin to a special forces ambush than one carried out by regular infantry units. The reason is simple. In Arma or other mil-sims we rarely have the opportunity to conduct a platoon ambush. Planning Planning an ambush will mean planning what, when and where will be ambushed and by who with what. The most important is to pick a good place. It should allow for the ambushing force to have enough concealment to not alert the enemy before they walk into the kill zone and enough concealment to retreat safely after the ambush. For that reason the element’s leader should look for forested or built up areas on the route. Terrain features allowing for better cover and field of view are also welcome. Formation An ambush will consist of three main elements: security – responsible for securing the flanks and spotting the enemy force, weapons – responsible for creating a base of fire, assault – responsible for assaulting the kill zone. Security elements can be constructed in two ways. They will either contain a lot of firepower and be equipped with SAWs and GLs or will focus on accurate fires on range and will use a designated marksman. A lot of the time in Arma we can't spare the heavy guns from the kill zone and the marksmen will not be as effective at the shorter engagement ranges of an ambush. The base of fire element will contain any MGs we can use and possibly AT specialists if we are ambushing a motorized enemy. Additionally the element leader might consider letting the weapons section control any explosives used for the ambush by attaching an explosives specialist to it. The assault element will help create interlocking field of fire in the first stage of the ambush and then will move to clear out the kill zone and the area past it. Additional elements can be assigned. A collections element may be assigned with clearing the kill zone by dragging bodies off the route and searching for documents/equipment. And a medic or a medical section may be created or assigned to a CCP to treat wounded. In Arma while there usually is a medic, there usually isn’t enough people to create a collection section. So the task falls to the assault element. Element leader is responsible for selecting positions for all the sections unless they decide to delegate that responsibility to section leaders. They set the location of the kill zone (an area where the enemy force will be contained and destroyed) and coordinate the work of the element during the ambush. Execution Positions are taken by the sections. First the security section. Then the weapons section and last by the assault element. The ambush starts by the security element spotting the main enemy force. It is crucial to not attack a scout section or vehicle instead of the main force. The security element relays that and any information about the enemy: quantity of enemy, quantity and type of vehicles, any special equipment, anything else that might influence an ambush. Until the ambush initiates it is very important to stay hidden. When the enemy element gets is in the kill zone, the ambush initiates. The ambush is always initiated by the most casualty producing weapon. The best systems to start an ambush with are, in that order: explosives (IEDs, claymores, mines etc.), AT launchers if the element is mounted, machineguns Once the designated weapon fires, the ambush begins and both the weapons and assault elements open fire. There is no set amount of time for this part of the ambush. The goal of it is to suppress the enemy in place and inflict as many losses as possible. Once the element leader is happy with the result they will signal to cease fire and assault. Some phrases to expect might be: “Cease fire”, “Lift fire”, “Walk through”. Additionally if the kill zone is divided up into fire zones there might be a call to “Shift fire”. When a command is given and the fire into the kill zone stops, the assault element walks through and clears the kill zone and a patch of land around 35 meters past the road/path (app. hand grenade range). Once the walkthrough is complete and the objective completed all of the sections retreat to the predesignated RP. The retreat order is opposite to the order of taking positions. First elements retreat the last. So the assault element leaves followed by the weapons section and the rear is brought up by the security element. Once at the RP the ambush is complete and the element can continue to the next task. Ambush shapes There are two main ambush shapes. Line and L-shaped. They are pretty self-explanatory. In a line ambush both the weapons and assault elements are set up along the route in a somewhat straight line. While an L-shape has the weapons section or part of it set up on a road bend, a barricade or something similar looking at the front of the enemy force. The shape should be chosen accordingly to the terrain but it is important to remember that we are still trying to achieve interlocking fields of fire when possible.
-
 Legionnaire-50-1 changed their profile photo
 -
@Mokum may be referring to voice changer software which you can use to make it sound like radio comms. I wouldn't bother because Falcon BMS currently uses enough resources on my laptop, I dont need a voice changer added to a host of other applications I have running. Anyway its a suggestion. https://www.voicemod.net/en/voice-changer/
-

[Project Reality Event] Back To Roots - BF2 Maps - TBD
=VG= GRNANDGLD replied to =VG= Sphee's topic in PR Cooperative
-
[Project Reality Event] Back To Roots - BF2 Maps - TBD
=VG= Sphee replied to =VG= Sphee's topic in PR Cooperative
Server will go up tonight for tests, event is still planned as originally stated to launch on the 20th, this is just to catch any issues with scripts and for input regarding recoil changes. -
Just say, "Enable Audio Feedback Mode" If that is not what you mean, I wonder if you mean a sound effect whenever you PRESS and also when you RELEASE the VHF and/or UHF buttons on your flightstick? I can only ask, if my voice command above was not what you are looking for.
-
VA with AVCS has that beautiful audio- and voice feedback when other pilots broadcast on VHF or UHF. I saw/heard that an audio- and voice feedback (microphone click and a noisy sound when broadcasting) also can be programmed for the pilot that speaks in the pit on VHF, or UHF. Any idea how to set this up? Thanks in advance
-
 Moizekus13 changed their profile photo
 -
[Project Reality Event] Back To Roots - BF2 Maps - TBD
=VG= Sphee replied to =VG= Sphee's topic in PR Cooperative
I forgot to mention, this is subject to how many people stay on overnight. If a handful of people stay on even after midnight, I can leave it on till the next day if population remains. If the server only has 1 person on or none, I'll shut it down till the next day. This is to encourage people to join at once rather than progressively, by means of pinging on startup, people seem to react differently to "server starting up" pings rather than "help us we're suffering" pings. -
.thumb.gif.3d961543fe012e56103a42a71f147b4f.gif)
[Project Reality Event] Back To Roots - BF2 Maps - TBD
Undaunted replied to =VG= Sphee's topic in PR Cooperative
Why will the server close? Why wont it stay up till the end day continuously like the second last event? Cool event btw. -
[Project Reality Event] Back To Roots - BF2 Maps - TBD
S.stanikic replied to =VG= Sphee's topic in PR Cooperative
AW YIIIS BOIIII!!! -
Hello! You know the drill, another event, another "why are the respawns so slow?" (we actually properly fixed it and I made sure in the previous test run) This one is gonna be a little different. I've decided to make several game changes. Some of which I'll list below, however this isn't an exhaustive list, as I've made numerous additions and changes to some layers, this is just an overall changelog to give you an idea of what to expect. PASSWORD: bf2event Date: TBD Hosted at: VETERANS-GAMING COOP | CUSTOM BF2 MAPS Download Link (CLICK HERE) Password: bf2event GAMEPLAY CHANGES: MAP SPECIFIC Littlebirds can drop ammo cases/light crates on some maps, alongside a mix of other vehicles dropping certain things they shouldn't. The implementation of vehicles dropping additional objects is janky visually, I'll explain the simple way to use them in detail during the event. To give you a better picture, in Daqing Oilfields Alt, I decided to delegate a light transport chopper to drop repair stations for the tank and APCs, in place of the missing logi truck. ACROSS ALL MAPS Large majority of weapons have received a noticeable reduction in recoil and deviation < This is very experimental, and I am able to tweak them in real time when necessary. NOTE: Recoil changes may need to be scrapped, as they cause noticeable lag when firing. You can request kits from Littlebirds, BRDMs, BRDM Supports, and VN-3s on any map they're present in. (Outcome of this poll) You can take any kit regardless of how many members are in your squad. RULES: MECH INF may claim an APC even if only 2 identical ones are available on the map, using a lighter APC if applicable. If a MECH INF squad has been made, and no APC squad is to be seen, you may create a second MECH INF squad to claim another APC for your mechanized squad, this is to encourage more usage of APCs. Standard VG Rules apply, do not teamkill, disrupt, or annoy other players, and do not waste assets or use them irresponsibly. An additional note for admins: I will not tolerate any usage of the !switch command, this command is ONLY used for myself to evaluate the bot team's performance on maps. You will be kicked if you use it, even jokingly. MAPS: Daqing Oilfields Dragon Valley Great Wall Gulf of Oman Highway Tampa Karkand Redux Kubra Dam Operation Clean Sweep Operation Road Rage Operation Smoke Screen Road to Jalalabad Sharqi Peninsula (NEW) Songhua Stalemate Wake Island 2007 Zatar Wetlands Please keep in mind that graphical discrepancies and balancing issues are expected, I've tried my best to minimize them without overworking myself to nitpicking on details. You'll still notice bits of weird things like maps without grids, no overview pictures, missing in-game asset lists, and such. Feedback is welcome as always. There will be a thread in the VG discord to let you drop feedback there conveniently and discuss it with me and others. As always, thank you so much @=VG= XOR for helping me immensely with making events better, and tolerating my constant whinging. Events like this wouldn't have had the boost in quality without people like him, Zeee, TEDF, Melon, and anyone else who's unconditionally helped me upon request.


.thumb.gif.ed10621c301b920f22bce51e1e1609b9.gif)