AVCS SENS is a voice command profile for the VoiceAttack program focusing on getting text-to-speech replies of various real world data such as indoor and outdoor weather, computer sensors of all kinds, and even date & time. Initially, I planned to separate each of these into their own profile, but in many ways, they all work together and sometimes depend on each other for additional data when available. Better to lump them all together under the concept of giving our VoiceAttack "personal assistant" some sense of the world around it, inside and outside its PC case.
Local outdoor weather voice commands are made available through connection to the Open Weather API, and this public AVCS SENS project has its own access key for all users of this profile. When Weather Monitoring is on, new weather information is checked periodically based on user settings, and set to text variables which VoiceAttack can return on command through text-to-speech replies. New 7-day weather forecast data is gathered once a day, with options to adjust this all the way down to hourly when users enter their own OWM API access key (optional).
Computer sensor voice commands are made available when running the AIDA64 Extreme sensor monitoring program, through the Shared Memory option for External Applications under the program preferences. This program is required in order to use any internal PC sensor commands, reports, or diagnostics. AVCS SENS reads individual sensor data directly from active memory, without ever logging anything to file, every few seconds. These values are averaged out and spoken with text-to-speech replies on command for individual sensors, or as part of a group of all sensors in a report or diagnostic command such as all sensors, or all CPU sensors, or all Graphics card sensors.
Indoor weather voice commands are only available when an external temperature & humidity sensor is connected by USB to the computer. This "AVCS-DHT1" Sensor is an Arduino powered device I designed with a DHT11 sensor in a small enclosure that sticks to the side of a PC case magnetically. I've created this DIY Build Guide for making one of these devices yourself, or you can also buy one designed & built by me according to that same guide here on the VG Store - though shipping outside USA may cost nearly as much as the device itself; I'm not a business, just a DIY enthusiast and I make everything by hand. Another feature unlocked by the AVCS-DHT1 is computer sensor diagnostics.
Diagnostics voice commands are unlocked when using both AIDA64 Extreme and an AVCS-DHT1 sensor. With these, all PC temperature sensor values in text-to-speech replies will be said in "degrees over ambient", a "delta-T over ambient" as you may hear it called in analysis videos such as this one here by Steve at Gamers Nexus talking about their PC case testing methodology. This is the true means to understand what computer sensors for temperature are reporting at any given time, by first accounting for the temperature of the room. Using a simple algorithm I wrote, this allows AVCS SENS to identify & flag atypical sensor values as compared to sensor baselines previously established and saved to file.
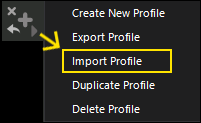
profile management button #2
If you have just downloaded the AVCS SENS profile from this website, unzip this download and review the contents. The VoiceAttack profile package is in the folder called 'AVCS Voice Sensors & Weather', and it is labeled '(IMPORT THIS)'. Begin by importing this profile into VoiceAttack. Press the second profile management button in the VoiceAttack window (on the right, see image), and then select 'Import Profile' as shown. In the Profile Import window, navigate to the folder containing that file labeled '(IMPORT THIS)' - select this file & press OK.
A warning window will pop up informing you that this profile uses actions which may execute applications, execute inline functions, execute plugin functions, and/or kill processes. As it pertains to this profile, AVCS SENS uses inline functions written in C# and Visual Basic for a variety of uses throughout commands such as my custom profile menu GUI, and the timer based monitors which read new sensor data every 3 seconds through the AIDA64 Shared Memory option, or which check for new weather data online from Open Weather API, or an (optional) attached AVCS-DHT1 temperature sensor over USB serial connection. The AVCS Sensor Menu buttons can open websites in your default browser, such as this AVCS Wiki Page or the VoiceAttack forums, or open the AVCS profile's save file in your default application for .txt files, and open the folder containing these AVCS config files. These are created on first time use, and recreated if deleted.
Press OK on the warning window to proceed, and then switch to the profile in VoiceAttack - it should appear on the list as 'AVCS Voice Sensors & Weather' with its version in parentheses. All of my commands and code are open for reading and review, I have not locked editing but highly advise against it. Please feel free to review my voice commands and the code in the various inline functions throughout AVCS SENS, and if you have any questions or are curious about what something does, I am happy to answer. All of my inline functions code used in all my AVCS profiles can also be found here on my Pastebin account, most entries start with "AVCS".
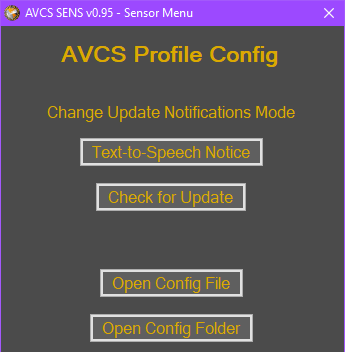
AVCS SENS profile config menu
On first time use only, the AVCS SENS Main Menu GUI will pop up, allowing users to become familiar with this central control panel used in this profile for setting several user specific options from location for local weather reports to profile update notification options, as well as user guides for quick reference to key topics covered in this Wiki, and also buttons for testing the included systems at the core of AVCS SENS. This profile is also able to check for any updates I may have released, which may include bug fixes, new features or commands, or even simple optimizations and typo corrections.
Before starting Sensor Monitoring or Weather Monitoring for the first time, please take a moment to open the Options menu for each Sensors, Weather, and Profile. Where helpful, I have included example text, mouse-hover tips, and links for more information to help with the learning curve in using AVCS SENS. If the Sensor Menu does not appear at first use, just say, "Open the Sensor Menu".
Many options are set by default, such as units used for text-to-speech replies for temperature or wind speed, even the city will be set by default to New York City until changed. Sensor monitoring through AIDA64 requires setup, detailed further down in this guide, and in the user guides inside the AVCS SENS Menu. As shown in the picture here, under Profile Options, users may select a notification mode for either a text-to-speech notification if the profile has been updated, or just a simple note in the VoiceAttack event log window, or you can turn off update checks altogether. Of course, a manual update check button is available for those who prefer it. All user settings are saved to the Config File, inside the Config Folder - again, manual editing is discouraged, but these buttons will allow you to review these files.
As noted on most every page of the AVCS SENS Menu, just say, "Open the Sensor Menu", anytime to return to this main control panel for this profile.
So many DIY electronics and programming projects use Open Weather to get accurate local weather data for free using their API. It is very simply a website URL that is created with the requests in-line so that it resolves to a flat web page of text containing the data requested, such as current local weather info including temperature, humidity, wind speed and direction, and even forecasts.
This project has a registered key that allows AVCS access to make API calls for all users of this profile. Existing users of Open Weather API may enter their own user key if they wish, and this key will be saved to the AVCS config file for this profile, unlocking additional choices in Weather Options.
Weather data is set to VoiceAttack variables every 15 minutes by default when Monitoring is on, for use in Text-to-Speech replies, with daily weather forecast data saved to file for access between checks. This allows for swift replies by monitoring weather information in the background and having it ready when asked. Using a weather command when monitoring is off will be much slower.
Accuracy of results may vary depending on the distance of local weather station(s) from your location.
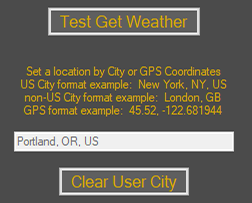
enter city name or GPS coordinates
Local weather data from Open Weather API can be queried and resolved by name for cities in the United States such as 'New York, NY, US' or abroad via city name and two-letter ISO 3166-1 Alpha-2 international country code, such as 'London, GB' or 'Berlin, DE'.
Users can also just right click anywhere on Google Maps to copy GPS coordinates to clipboard and paste them into the 'Save User City' input box. These do NOT need to be specific, anywhere near where you live is fine, but closer points may be more accurate based on nearby OWM stations.
In the Weather Options Menu, choose Unit and Wind Speed values from metric or imperial, and how often new weather data is retrieved (default 15 minutes). These settings are saved to the AVCS config file, and will persist between different versions if I update this profile, you'll not need to set them again.
NOTE OF CAUTION: There is little need to set GPS coordinates exactly where you live from Google Maps, and if the Weather Options menu or user config file can become visible in a live stream or recording, your saved setting may be visible to others. Don't dox yourself! Be smart and just pick coordinates from the map using a local airport or transit station servicing your entire city or town.
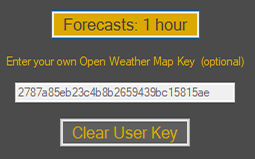
forecast interval using personal OWM key
The AVCS SENS project has its own Open Weather API key, and this allows all users access to daily 7-day weather forecast checks, and the option to set current local weather checks between 15, 30, or 60 minute intervals. When this key field is blank, the default AVCS key is used.
These and any checks of the Open Weather API take a minor amount of computer resources for a second or two, similar to opening a simple webpage with only text, a tiny blip in the VoiceAttack process usage, but still wise to limit the frequency if desired, and so it is up to the user to decide. Personally, I leave local weather checks at 60 minute intervals (and I live in Portland, Oregon where weather can change at the drop of a hat!) - not because this is will affect system usage or even battery life to a large degree, but just because it's not really needed. Also, (using the supplied default AVCS key myself) I don't mind the default 24-hour interval for 7-day weather forecast checks.
With that being said, if users would like to sign up for and enter their own Open Weather API key, additional choices will become available for current local weather checks as frequent as once every minute. Also, the Forecasts frequency button will become visible, and users may choose from intervals between 1, 2, 4, 6, 8, 12, and 24 hour checks for new 7-day local weather forecast data.
To get PC sensors data into this VoiceAttack profile, the AIDA64 Extreme sensor monitoring program is required. I happen to have used this program for nearly a decade, and while I have several sensor monitoring programs including free offerings such as HWMonitor and others, I decided to use AIDA64 for getting text-to-speech sensor data because it offers options for External Applications to access Shared Memory and therefore all sensor data from available sensors we can choose from a list. This avoids constantly thrashing our storage drive(s) by needlessly writing and overwriting this sensor data to a log file and then parsing that for the required data, as the information is already available in the RAM if we just use a tool to get it, such as AIDA64's convenient Shared Memory option. It's an affordable and stable program with a good history and tons of great features, so I personally recommend it for anyone who wants a decent piece of software with a good reputation.
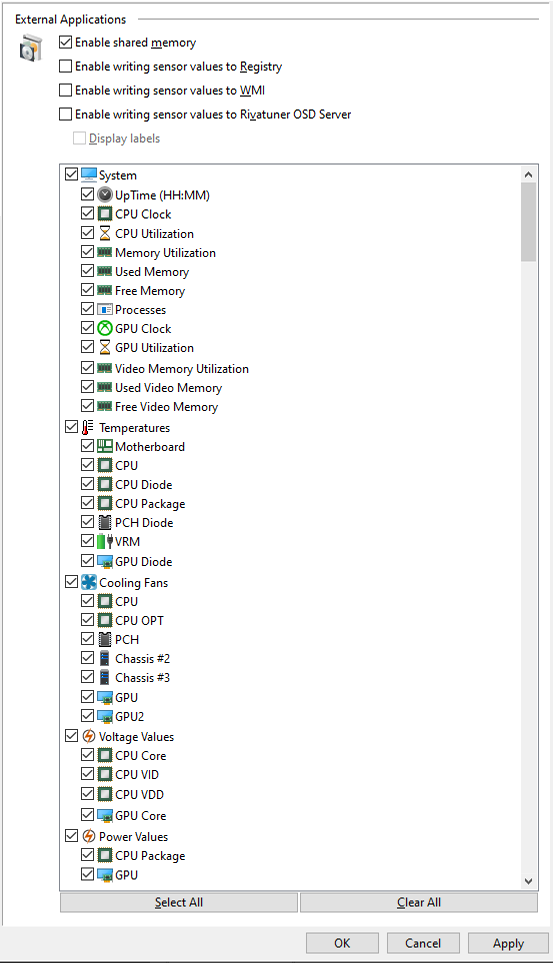
you may check all boxes under Cooling Fans labeled 'Chassis' as shown above
For this AVCS Profile to access Shared Memory Sensor Data from the AIDA64 program, first open the main AIDA64 Preferences Menu, then select the option for External Applications on the left. In the available sensors listed on the right, check the box next to those listed in the image shown here (if available on your PC) - these have command keywords already set, and some are used in AVCS Sensor Diagnostics commands.
Finally, check the box at the top to 'Enable shared memory' and click OK.
Use the button in the AVCS Sensor Options Menu to test for valid AIDA64 Shared Memory data, even before turning on active Monitoring. Test data will be automatically copied to the clipboard for manual review.
Any number of case fans recognized by AIDA64 as 'Chassis fans' can be assigned a keyword such as 'Rear Case Fan(s)' or 'Intake Case Fan(s)'. Fans tied together in RPM such as dual or triple GPU fans are pointless to enable here, and users should only select one of any set tied together.
Any sensor listed in the image shown here may be queried individually at any time, or read out as part of a report containing sets of sensors such as all primary CPU sensors, or GPU sensors, or even the entire system. These commands naturally were inspired by love of STTNG, and follow a 'higher is faster' connotation for the levels 5 through 1, with 1 being the most complete yet slowest and possibly least automated of all reports (or diagnostics, if using an AVCS-DHT1).
Running a Level 5 Report on the Graphics Card or the CPU may return only the top one or two most relevant values, whereas saying 'Run a Level 1 Report' will begin a very long speech listing each and every attached sensor and their last reported average value.
All sensor values are added to 10 rolling data points spanning back 30 seconds, averaged out over this time once every 15 seconds. This means any given set is reusing around 5 data points from the last average set, and I've found this to be most accurate.
Say 'Stop All Sensor Commands' to halt reports speech readouts anytime
NOTE:
Never mistake AVCS Profile Sensors commands as getting true and important values for use in overclocking or system stability management, please continue to use AIDA64 itself and any other tools - AVCS only reports averages spanning over 30 seconds and cannot keep up with the level of accuracy and speed required for anything so important!
As with Sensor Reports, any sensor listed in the image shown above may be queried individually at any time, or if using an AVCS-DHT1, read out as part of a diagnostic of recent averages containing sets of sensors such as all primary CPU sensors, or GPU sensors, or even the entire system. Also inspired by the diagnostics portrayed in STTNG, these commands follow that same 'higher is faster' connotation for the levels 5 through 1, with 1 being the most complete yet slowest and possibly least automated.
Saying 'Perform a Level 5 Diagnostic on the CPU' (or GPU, or full system) will first check if at least a quarter of the available sensors of that request are reading higher than basesline averages in the current assumed state of the PC. If all is well, and less than a quarter of sensors are 'high', it will simply report back saying, 'All systems are operational', else it will read out any sensors reading higher than average. AVCS Sensor Diagnostics can be useful & fun for live streams or personal use, but are truly 'differential diagnosis without a prognosis', meaning the user must cross check for themselves to provide their own second opinion & continue with further testing outside AVCS.
"AVCS Sensor Diagnostics can be useful & fun for live streams or personal use, but are truly 'differential diagnosis without a prognosis', meaning the user must cross check for themselves to provide their own second opinion & continue with further testing outside AVCS."
Levels 5, 4, and 3 each will report "All Systems Operational" when no sensors meet their conditions. Running a Level 4 Diagnostic will list any/all of the available sensors of that request reporting higher than basesline averages in the current assumed state. The Level 3 will report any high OR low, and Level 2 will report every sensor in the requested set (or entire system) starting with any reading high, then those reading standard, then any reading low, in a very long Text-to-Speech return. Level 1 is the same as 2, but for each PC state, and prompting users to simulate low through extreme PC use states.
All PC sensor values are added to 10 rolling data points spanning back 30 seconds, averaged out over this time once every 15 seconds, with new AVCS-DHT1 sensor data twice a minute. This means any given set is reusing 5 data points from the last average set, and as stated above, I have found this to be more accurate. The most accurate live sensor data will always be found in AIDA64 itself.
Before using Diagnostics, users must first open the Sensor Menu to the Sensor Options, and Establish Baselines for use in diagnostics for comparison. Follow instructions in the menu to set these up - note that only a "LOW" baseline must be set, if desired, for comparison to a mostly idle state regardless of the current operational state of the PC.
Say 'Stop All Sensor Commands' to halt diagnostic speech readouts anytime
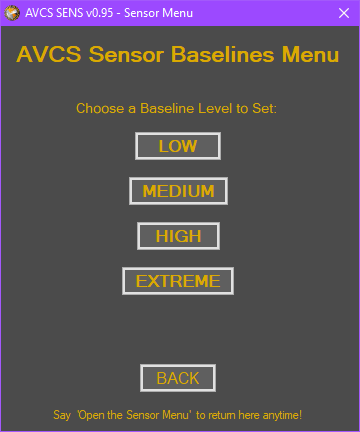
press the 'Establish Baselines' button in the Sensor Options Menu
DHT Monitoring in AVCS SENS is a secondary monitor tied to the Sensor and/or Weather Monitor. If either of these are started, DHT Monitoring will try to start. If no DHT sensor is detected, indoor weather & sensor diagnostic commands will not work. If both Sensor & Weather Monitoring are turned off while DHT Monitor is on, the DHT Monitor will also turn off.
DHT Monitoring, and therefore Sensor Diagnostics, requires an attached Arduino or equivalent microcontroller with a temperature and humidity sensor sending a string of decimals over a USB connection in a format expected by AVCS. This allows for 'delta-T over ambient' computer temperature sensor diagnostics using a simple algorithm I designed to flag atypical high or low sensor average values as compared to established baseline averages on file. Fan speeds are also factored in, as device temperatures are managed while fan speeds go up, working even harder to do so when filtered intakes become clogged over time.
I have created a DIY build guide for users to create their own AVCS-DHT1 sensor prototype, and I am making them available for purchase in the VG Store as well - though I should note that I make everything by hand myself just as anyone following the build guide would (flaws and all), and shipping outside the continental United States may cost as much as the pre-built sensor itself - I do not qualify for high volume low price shipping.
The AVCS-DHT1 unlocks Sensor Diagnostics and PC temperature readouts in "degrees over ambient", when using AIDA64 Extreme as described in this Wiki. In order for Diagnostics to have something to compare to, users must first establish baseline sensor values to be saved on file. It is a good idea to first thoroughly clean your PC including all filtered intakes, blowing the dust out of any metal fins used for cooling, clearing dust off fan blades, and out of radiators (if using liquid cooling). This way, baseline sensor values can be recorded from a "clean" state, and may even help users identify when the computer has gone without cleaning for too long. If PC components change, such as buying a new graphics card, establish new baselines.
Without this external sensor to gauge the ambient environment outside the PC case, diagnostic commands and indoor temperature/humidity commands will not return values.
Establishing Sensor Baselines - Low, Medium, High, Extreme
From the Sensor Options Menu of the AVCS SENS Menu, with Sensor Monitoring set up and already running (for at least 45 seconds), press the 'Establish Baselines' button. Instructions will guide users to bring the computer into 4 states of operation from (mostly) idle to medium, high, and extreme states that best resemble the users own operation of the computer, either naturally or artificially via benchmarking tools. AVCS Diagnostics attempts to assume the current state based on most sensors reporting similarity to one of these 4 baseline sets of averages, and therefore make diagnostic notes of any sensors as compared to those averages.
Users may also set only 'LOW' and therefore get diagnostic comparisons against a baseline idle state only, no matter what the current operational state of the PC is assumed to be. If other baselines are not established, their data will be a copy of the 'LOW' baseline state that was set.
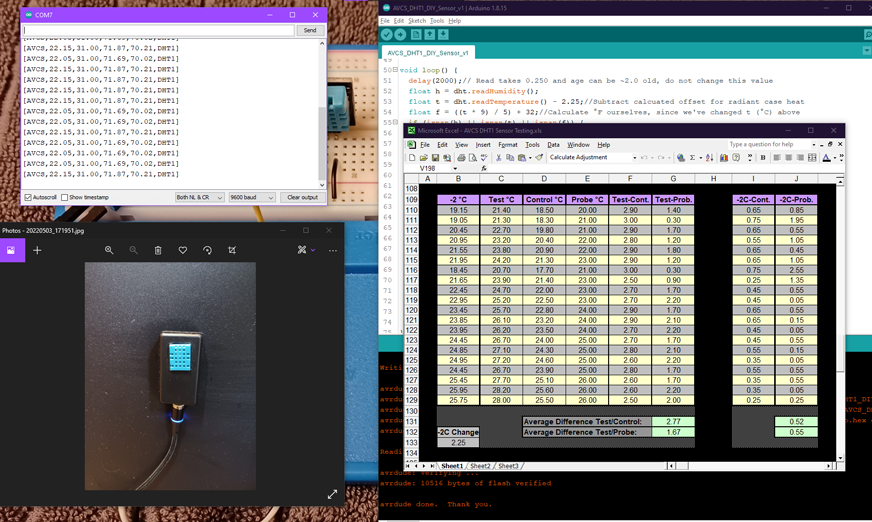
testing for consistent offset for case heat over several hours
One of the challenges I faced when designing and building the first prototypes for the AVCS-DHT1 sensor was a slight yet significant difference between a DHT11 sensor mounted in this tiny plastic case vs. the same brand/model DHT11 sensor dangling just a few centimeters from the prototype. It became very clear that a small amount of heat is generated by the Arduino board inside, radiated to the small plastic case, and therefore to the DHT11 sensor itself, even though the face of this sensor was protruding outside the AVCS-DHT1 case.
In order to evaluate and identify this offset, I used the thermal probe on my digital multimeter, a retail wall device reading temperature and humidity, and a bare DHT11 connected to the same model Arduino but on long wires and hanging in the air just a few centimeters from the AVCS-DHT1. I recorded values from each of these sensors every fifteen minutes into an Excel spreadsheet, with my testing environment temperature controlled down to a ~65 degree (F) starting point, and slowly raising to around ~80 degrees (F) over several hours.
As shown in the image here, I was able to identify a very consistent trend I could use to calculate an approximate offset value for both temperature and humidity values which were skewed by this radiant case heat. It is important to note that if someone is building their own AVCS-DHT1 and certain parts including the plastic case linked on the Parts List of the build guide are substituted for any other equivalent part, this offset which is now present in the code and which will run on the Arduino powering the AVCS-DHT1 sensor may need to be adjusted itself in order to remain as accurate as possible. I would suggest following my own methodology and using at least 2 other sensors in addition to your own and including a bare DHT11 of the same brand/model/type as the one in your AVCS-DHT1 case, as I had done, and hanging near but unimpeded by radiant heat, to ensure that a different offset is not required or to identify a more accurate one for your specific parts or choice of case.
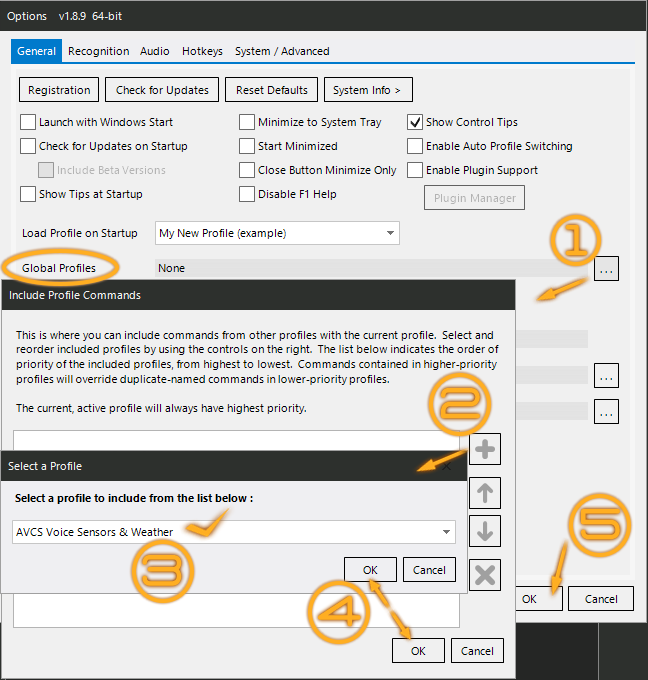
AVCS SENS is designed to be a Global Profile always ready to respond when asked a question
The AVCS SENS profile is designed to be a Global Profile in VoiceAttack, to run in the background without ever needing to be 'switched to' in order to use the included sensors & weather voice commands. Users may of course use this profile by simply switching to it in the VoiceAttack profile menu, and then enabling either the Sensor Monitoring or Weather Monitoring systems (or both) to begin using these voice commands. For those who would like to take advantage of the AVCS SENS profile as I do, no matter which of my many other VoiceAttack profiles I use for various games or programs is currently active, you can set AVCS SENS as a Global Profile following the steps below.
Open VoiceAttack Options by pressing the wrench/spanner icon ( ![]() ) in the lower right
) in the lower right
1. Following the image to the left, under the 'General' tab along top, first press the "..." button to open the Global Profiles menu.
2. Press the "+" button to open the Profile Selection window so we can choose which profile to add.
3. From the profiles list, select the "AVCS Voice Sensors & Weather" profile (latest version) as shown.
4. Press the "OK" buttons to confirm your choice in the Profile Selection window and Global Profiles window.
5. Finally, press the "OK" button to close VoiceAttack Options and save your settings. Now, no matter which profile you are currently in, all AVCS SENS voice commands will be available.
You can say, "Begin Sensor Monitoring" (or) "Begin Weather Monitoring", to manually start-up AVCS SENS and begin using these voice commands

↑ these 'function' commands in AVCS SENS can be called from any profile to autostart monitoring systems ↓
users can set any or all monitor systems to autostart without ever switching to this profile!
If you prefer to use your own personal profile (just like I do, as my 'personal assistant' when I'm not in a game using some other profile), you can very easily set up an auto-startup command to allow AVCS SENS Sensor or Weather Monitors (or both) to begin whenever you load your 'personal profile'. This is yet another way to use and to start using AVCS SENS profile commands without ever actually having to switch to the profile. The method described below requires AVCS SENS to be a Global Profile as described above, or at the very least, included into your own 'personal profile' through its profile options menu via "Include commands from other profiles:" (see VoiceAttack manual).
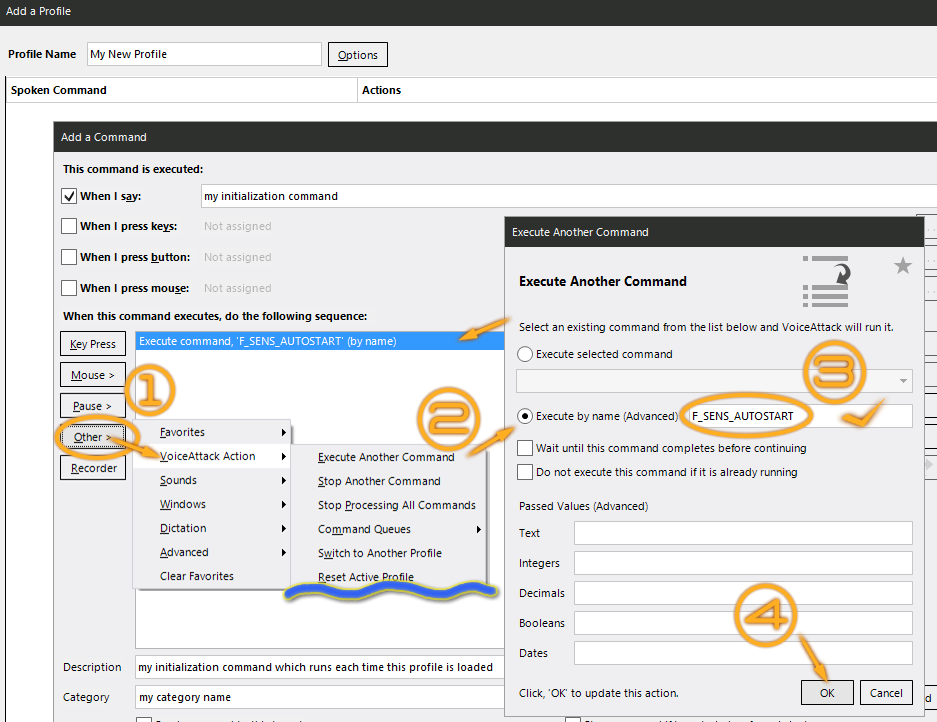
For this example, the steps below show a 'new profile' creating a 'new command' which will have the singular action to 'Execute Another Command (by name)' - imagine this as if it was your own personal profile, whatever you use when not using some other profile. Whenever this profile is loaded (such as when you first launch VoiceAttack), we can set it to fire this "initialization" command anytime it loads - this will in turn initialize the AVCS SENS system(s) so they can begin monitoring in the background automatically without having to be told to start up by voice command(s). There are three optional autostart 'function commands' in AVCS SENS - one for starting only the Weather Monitor systems (F_OWM_AUTOSTART), one for starting only the Sensor Monitor systems (F_AIDA_AUTOSTART), and one to start both (F_SENS_AUTOSTART).
Create a new command inside your personal profile - "When I say" can be anything
1. In the new command window, select 'Other > VoiceAttack Action' as shown. This actions list will be much longer than pictured here.
2. Select the action 'Execute Another Command' - a pop-up window will allow us to set the options for this action.
3. Select the option for 'Execute by name (Advanced)' and place the cursor into the text entry field. Copy or type out one of the function command names above, as pictured, depending on the system(s) you want to autostart in this manner. You may check or uncheck the two boxes for additional options if desired, hover your mouse over them for more information on what they do, and refer to complete info in the VoiceAttack Manual if you are unsure how these can be used or when they can be useful. Neither are required, and will not interfere with the method we are using here now if used or not used.
4. Finally, click the 'OK' button to close this window and add this action to the command, just like the image. If you never intend to call this command by voice, you may wish to uncheck the box next to "When I say", therefore making this command more like a 'function' we call to do its actions as needed, rather than by voice command. When done, press 'OK' in the 'Add a Command' window to finish adding this new command to your profile.
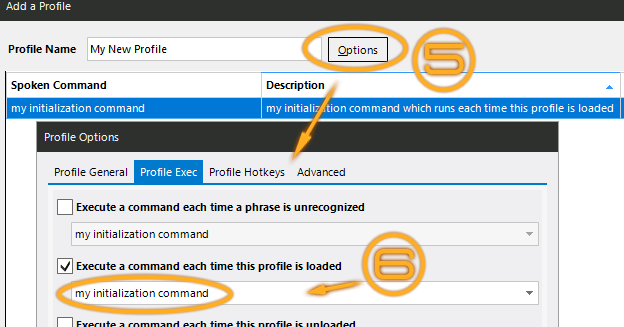
5. Next, press the 'Options' button near the top of your profile editor window, to the right of your Profile Name, as pictured. This will open the Profile Options Menu - select the 'Profile Exec' tab along the top of this options window to see the options in the picture here.
6. Check the box next to 'Execute a command each time this profile is loaded' and from the drop-down list, select the command you just created above (whatever you called it). When done, just click 'OK' to close this options window, and then also the 'OK' button in the profile editor window itself to apply all these changes to your profile.
Say "Open the Sensor Command Reference" anytime to review available voice commands for AVCS SENS
Author Note
The way I use VoiceAttack is to have my own personal "everything" profile load whenever VoiceAttack starts up, and when I play a game, I switch to the profile I use for that specific game. But my personal profile (I call it "Malcolm") is always a Global Profile. That way, I can use those general commands (like, "pause music player", etc.) no matter what game I am playing. This method above is an extension of that concept, so that all users of AVCS SENS have a somewhat easy method for using this utility profile in that same manner, as a global background profile always ready to answer our voice commands. Using the auto-startup method described above myself, my "Malcolm" profile makes sure that my AVCS SENS profile is running its Sensors Monitor and its Weather Monitor anytime I load "Malcolm", automatically. Like my AVCS CALC profile (my other "utility" profile for VoiceAttack), I never switch to the AVCS SENS profile, it just sits in the background always loaded and always ready for voice commands. If you need assistance, just ask - I'm always happy to help new VoiceAttack users with questions about my AVCS profiles!
AIDA64 and Open Weather are not affiliated with AVCS
Weather data is provided by OpenWeather (TM) under their CC BY-SA 4.0 license
AIDA64 is a Registered Trademark of FinalWire Ltd. ©2010-2022 All rights reserved.
Images and text depicting the AID64 program(s), title, logo, or other elements belonging to AIDA64 or FinalWire Ltd. are used only for educational and/or instructional purposes relating to demonstration & use on this Wiki page.
"AVCS SENS", including the Profile Package for VoiceAttack, the AVCS-DHT1 Sensor and Sticker Label, and it's DIY build guide, as well as this Wiki page are creative works by SemlerPDX shared under CC BY-NC-ND 4.0 March/June 2022


