
Land-Nav
Entry posted by =VG= The_Polish_Guy in Basic Techniques
208 views
Land navigation is a skill that every mil-sim player should possess. Without it you become absolutely useless the second you lose your GPS. Thankfully using a map, a compass, map tools and your brain is not that hard. I’ll cover the equipment necessary, how to read a map, how to lo
Equipment
For basic navigation you’ll need:
- Map
- Compass
- Map tools
Additionally remember to bring a flashlight when operating at night.
Map reading
Maps in Arma are very accurate, that’s why it helps a lot to know how to read them. I will show an example of a map fragment from Altis to illustrate some of the basics. I am using the Enhanced Map Ace Version mod which makes maps a bit more realistic.
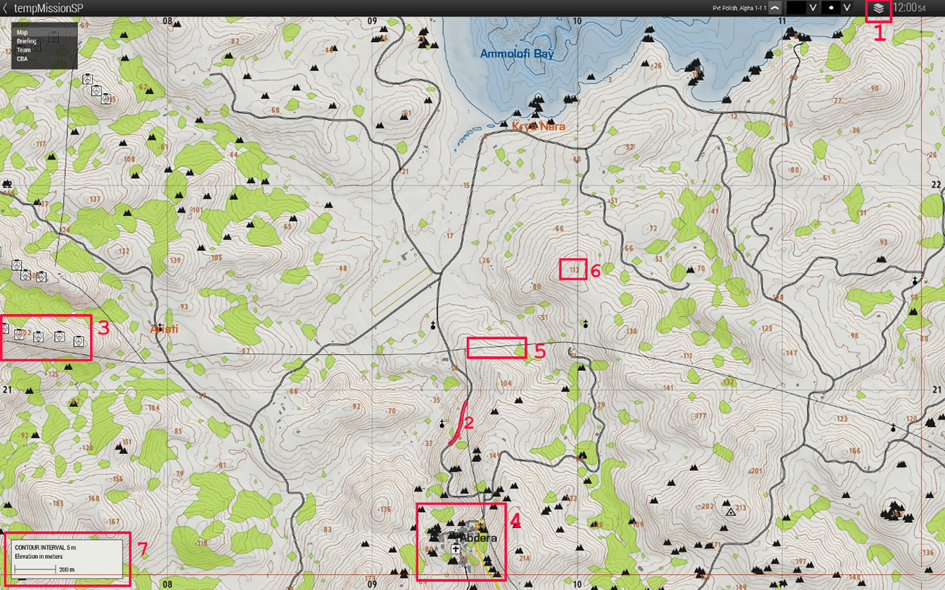
- Using this button we can switch between satellite view with topographic markings and clean topographic map. The latter is usually better for navigation because there’s less clutter on the map.
- Roads are marked with different colors depending on how big they are. Usually the brighter the color the bigger a road. Here we can see grey marking a relatively small road and yellow marking mor major road.
- Boxes with symbols in them mark certain structures. On this fragment we can see windmills on the west and a church in the town of Abdera. Additionally some smaller symbols show up like chapels by the roads and more importantly rocks in many places.
- Buildings like in this small town are marked with grey boxes resembling their real shape.
- Sometimes powerlines are marked on maps giving us yet another reference point to navigate by.
- These numbers mark the height above sea level. They are not hill numbers but only their height. Communicating by using the numbers as names of the hills can be misleading.
-
Possibly the most important take away from this example the contour lines. Contour lines are all of the tiny brown lines that litter the entire map. They show us at what height above sea level a certain place is. On this map we can see that every interval is 5 meters in elevation which means every line is 5 meters above or below the line next to it. Additionally the slightly fatter lines are in this example 25 meters apart.
In Arma the map is interactive, which means it will change the level of detail as you zoom in and out. That also applies to the contour lines. The distance between the lines will change abut it’s always shown in the bottom left corner.
Because the vertical distance between every line is the same we can easily tell if a hill is steep or not. The closer the lines are to each other, the steeper the slope and the other way around, the further they are the slope is less steep.
By learning to read contour lines we can easily not only orient ourselves in the terrain but also find suitable routes that give us enough cover.
Contour lines are also drawn on water where they symbolize the depth.
Of course there are many more symbols on maps, but I think they are pretty self-explanatory. Of course the green is trees and the blue is water. And in the middle of the fragment we can see a landing strip marked.
Using the map tools
Map tools can be found in the Tools section in the arsenal. You do not have to equip them in any specific slot, but only have them somewhere in your inventory.
To open them on the map you use ACE self-interact (default: ctrl+win) while your map is open. You select Map Tools and then small or normal map tools.
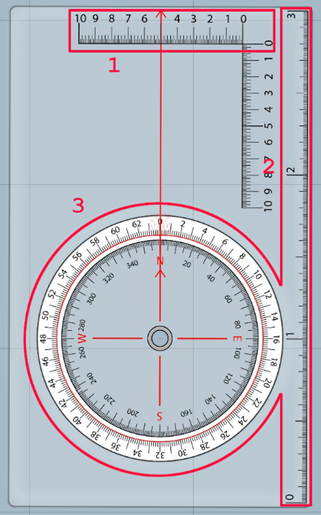
- Those lines are used for measuring distance. They are exactly 1kmx1km no matter how much you zoom in or out the map.
- The line on the side of the tool is 3km long and is also used for measuring range.
- The circle in the middle of the tool is used for measuring azimuth on the map. The inner circle is marked with degrees and the outer with milliradians.
By holding alt and left click you can rotate the tool to fit whatever you’re measuring. To drag the tool hold left click and move it around. And if you need to draw a line (ctrl+left click) on what you’re measuring the tool will make sure it is straight.
Orienting the map
To start creating a route we first need to know where we are. For that purpose we have to find a way to locate our position on the map. There are a couple ways of doing this:
- Landmarks – if we are next to a high tower next to a river, it will be easy to find a tower on the map and the river next to it. Then we just have to double check it with something else like terrain features and we’re good to go.
- Terrain association – this is a process of looking around, noting the terrain features (hills, rivers, buildings, etc.) and trying to find a place on the map that resembles it.
-
Triangulation – for this you would have to see some landmarks. If you do you can measure an azimuth (using a compass) to each landmark and then draw a line on that azimuth from each landmark. The place where all three lines intersect is your position.
If you have a rangefinder or some other way of measuring range, you can do this with only one land mark. You simply draw the line on the correct azimuth and measure how far away from the object you are. Then mark that position on the map.
When trying to orient the map, altitude is your friend. The higher you are, generally, the more landmarks and terrain features you see. That allows for greater detail in locating your position.
Planning a route
I will not focus on the tactical planning of a route one should take to have the most advantageous position in case of a contact. I will show only how to move from point A to point B without getting lost. And for that there are two ways.
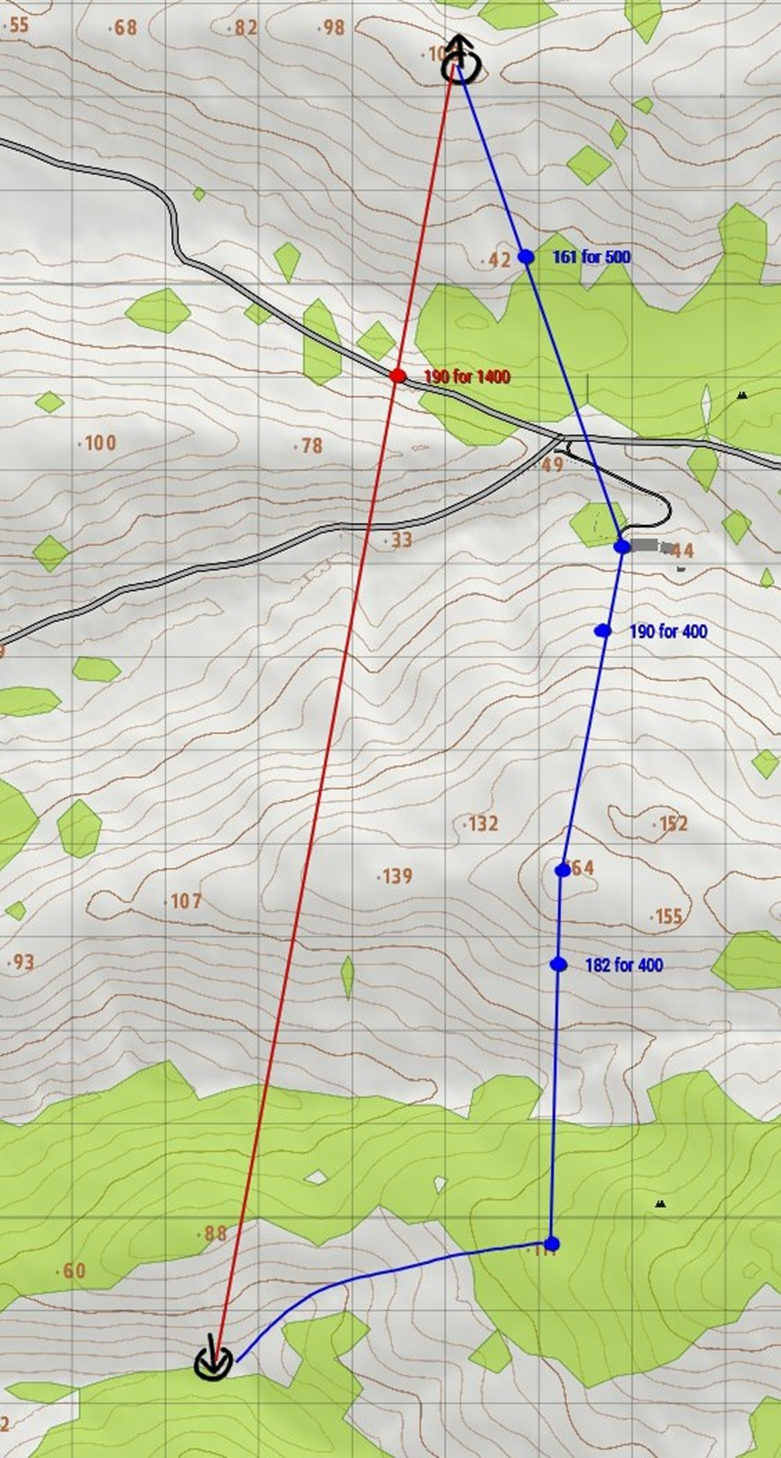
In this situation I have to move south towards some position. The position is not clearly marked and has no real features so it might be easy to miss.
The first way of doing this is to set an azimuth towards the target and start walking. This is generally the preferred method only if there are not landmarks to guide you. Using this method it is easy to deviate from the path, miss the objective and worse.
The preferred way of doing things is finding waypoints that we know will be easily to locate if we can get in their general area. In this example I decided to head for a house with a driveway. It will be easy to locate even if I miss it by a 100 meters or more. Then almost directly south of the house is a ridgeline. I choose the highest point of the ridgeline as a waypoint because it will probably be visible from the house itself and even if not, it will be easy to find even once I’m on the ridge. From there I go almost straight south. This is where the issues start but thankfully the lowest point of the valley floor is clearly visible on the map. I go looking for that. Once I find that I follow the valley floor and it leads me straight to my objective.
Most of the time setting waypoints will take time and the route will be longer, but it will save you from getting lost. Often when anticipating enemy contact you will move from landmark to land mark anyways because that might give you the best cover.

0 Comments
Recommended Comments
There are no comments to display.
Join the conversation
You are posting as a guest. If you have an account, sign in now to post with your account.
Note: Your post will require moderator approval before it will be visible.