
Use of TFAR (ArmA 3 Guide)
Entry posted by =VG= The_Polish_Guy in Basic Techniques
554 views
This part is dedicated strictly for Arma 3. As it is a quick manual on how to use TFAR radios. This post will contain:
- Installing the TS3 plugin
- Keybinds
- Radio types
- Using the radio
- Changing the frequency
- Setting an additional channel
Installing the TS3 plugin
To use TFAR you need to have a TeamSpeak client installed. I will not cover either how to install TS nor how to set it up. The only thing I will say is that for TFAR usage you should use push to talk. It is possible to stick with voice activation but if your audio setup is not perfect it will just annoy everyone around you in-game.
To install the TS3 TFAR plugin you simply have to access the TFAR mod folder. The easiest way to do that is through the game launcher.
- Open the game launcher after subscribing and installing the mod from steam workshop.
- Launch TeamSpeak.
- Find Task Force Arrowhead Radio (BETA!!!) in the list of mods.
-
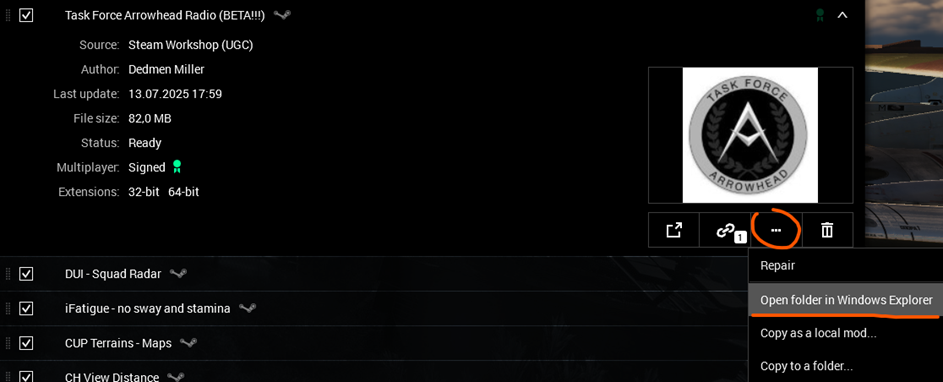
Open the mod’s directory (image below).

- Go into: \@Task Force Arrowhead Radio (BETA!!!)\teamspeak
- Open: task_force_radio.ts3_plugin.
- This will open an installer for the plugin. Go through the installation process.
- Restart TeamSpeak if it hasn’t done it automatically and you’re good to go.
To enable and disable TFAR you can go into Tools>Options>Addons and press disabled/enabled button.
Keybinds
Before reading through the Keybinds I suggest re-binding a few things to help with TFAR use in-game.
Zeus Ping / Zeus Interface: change from “Y” to “2xY” or other more suitable key
[ESC>configure>controls>Zeus>Zeus]
Vanilla Push To Talk: change from “Caps Lock” to a desired button or unbind completely
[ESC>configure>controls>multiplayer>Push To Talk]
Push-to-talk button in TeamSpeak Direct Speech.
Caps Lock To talk on personal radio.
CTRL + Caps Lock To talk on a long range radio.
CTRL + P To open the personal radio interface (the radio must be in the inventory slot).
CTRL + [/] Cycle through available personal radios.
CTRL + Up/Left/Right Arrow Rapid switching of personal radio stereo mode.
NUM[1-8] Rapid switching of personal radio channels.
ALT + P To open a long range radio interface (a long range radio must be put on your back, or you should be in a vehicle in a position of a driver, shooter, or pilot assistant). If a number of radios are available – you'll be offered to choose one. One of them can be set as active.
CTRL + ALT + [/] Cycle through available long range radios.
ALT + Up/Left/Right Arrow Rapid switching of long range stereo mode.
CTRL + NUM[1-9] Rapid switching of long range radio channels.
CTRL + TAB To change the direct speech volume. You can talk: Whispering, Normal or Yelling. Does not affect the signal volume in the radio transmission.
CTRL + ] Select next personal radio.
CTRL + [ Select previous personal radio.
CTRL + ALT + ] Select next long range radio.
CTRL + ALT + [ Select previous long range radio.
CTRL + [←,↑,→] Change personal radio stereo mode.
ALT + [←,↑,→] Change long range radio stereo mode.
T Transmit on additional channel of personal radio.
Y Transmit on additional channel of long range radio.
ESC To exit from the radio interface.
Radio types
TFAR radios have two main types. Short range (personal) and long range (backpack). Additionally radios can be found integrated into some vehicles. This is mod dependent but they function like any other long range radio.
Each radio in TFAR has it’s encryption key. It means that it can connect to only radios with the same encryption key. There are three main encryption keys in TFAR (BLUFOR, INIPENDENT and REDFOR). A common misconception is that short range radios cannot contact with long range and vice versa. That is not the case. As long as the frequency is set properly and both radios are in rage there should be no issues.
Below you can see a list of all the radios assigned to their encryption category.
(BLUFOR Radios)
Radio RF-7800S-TR (rifleman): 30-512Mhz / 2 km
Radio AN/PRC-152 (personal): 30-512Mhz / 5 km
Radio RT-1523G (ASIP) (long range): 30-87Mhz / 20 km (30 for inbuilt)
Radio AN/ARC-210 (airborne): 30-87Mhz / 40 km
(INDEPENDENT Radios)
Radio AN/PRC-154 (rifleman): 30-512Mhz / 2 km
Radio AN/PRC148-JEM(personal): 30-512Mhz / 5 km
Radio AN/PRC-155 (long range): 30-87Mhz / 20 km (30 for inbuilt)
Radio AN/ARC-164 (airborne): 30-87Mhz / 40 km
(REDFOR Radios)
Radio PNR-1000A (rifleman): 30-512Mhz / 2 km
Radio FADAK (personal): 30-512Mhz / 5 km
Radio MR3000 (long range): 30-87Mhz / 20 km (30 for inbuilt)
Radio MR6000L (airborne): 30-87Mhz / 40 km
Additionally the list contains the base range of each radio. However you have to remember that the range can change depending on the use conditions. Biggest factor besides range is terrain. Hills, buildings or forests might limit the range of a radio. The range can also be influenced by the server addon settings set by the administrator / mission maker.
Using the radio
Below is a simple guide on what all of the buttons on a radio do. The images below show only the western radios (AN/PRC-152 – shortrange and RT-1523G – long range).
RT-1523G
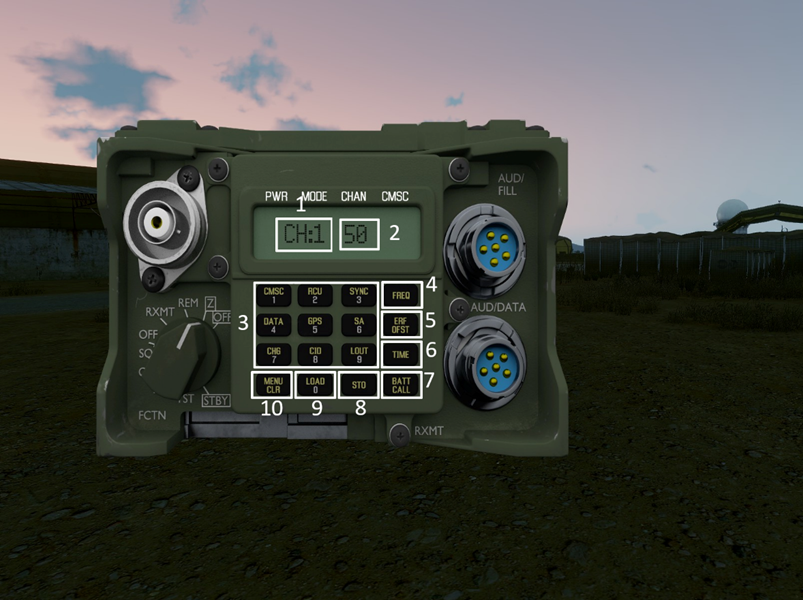
- Currently selected channel
- Frequency of the currently selected channel – this is where you input a new frequency
- Channel selection 1-9
- Set frequency – press after inputting a new frequency
- Set additional channel
- Increase volume
- Decrease volume
- Stereo settings
- Speakers
- Clear frequency – clears the current frequency and lets you input a new one
AN/PRC-152
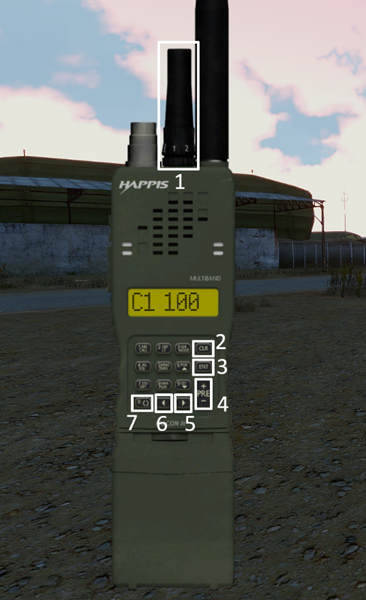
- Decrease volume (LMB) | Increase volume (RMB)
- Clear frequency
- Set frequency
- Next channel | Previous channel
- Speakers
- Set additional channel
- Stereo settings
Changing the frequency
Changing the frequency is the most important and the most common operation done on a radio. It’s also a very simple one. To change the frequency:
- Bring up the radio [ctrl/alt + P]
- Clear the current frequency by pressing the Clear Frequency button
- Input the new frequency using your keyboard
- Press the Set Frequency button
Confirm with a radio check and you’re good to go. Remember that the frequency will not be changed from the previous one until you confirm by pressing the Set Frequency button.
Setting an additional channel
Additional channels are useful when communicating between different asset groups / teams. For example a squad leader will always carry only a short range radio but will have to communicate with the squad or at least section leaders and assets/HQ. For that they should set an additional radio channel. And to do that they have to:
- Bring up the radio [ctrl/alt + P]
- Switch to a different channel
- Input the additional channel frequency
-
Press the Additional Channel button
Now the channel marking should change from C2 to A2 or CH:2 to CA:2 signaling that the selected channel is set as additional - Switch back to the main channel
Now the secondary channel can be used by pressing [T – short range] or [Y – long range].
Additionally stereo settings can be adjusted to make it easier to differentiate between channels
0 Comments
Recommended Comments
There are no comments to display.
Join the conversation
You are posting as a guest. If you have an account, sign in now to post with your account.
Note: Your post will require moderator approval before it will be visible.